
Moons of Peril is a new bossing encounter in OSRS that bears a lot of resemblances to the Barrows Brothers. Unlike Barrows, which forces you to go up against 6 brothers, the Moons of Peril dungeon (Neypotzli) features 3 demi-bosses: Blood Moon, Eclipse Moon, and Blue Moon.
To get access to the dungeon, you first have to complete the quest ‘Perilous Moons‘ which will also function as an introduction to the dungeon in which you go up against the three bosses for the first time.
How to get there
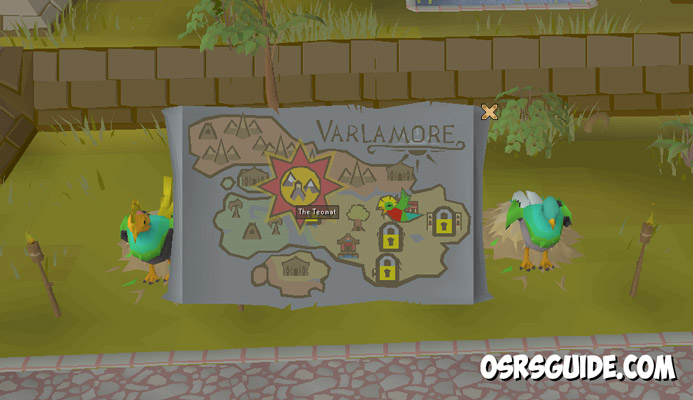
To get to the Moons of Peril dungeon (Neypotzli), fly your Quetzal to ‘The Teomat’ and then walk South towards Cam Torum (quest Icon on the map) to start the Perilous Moons quest at the gate.
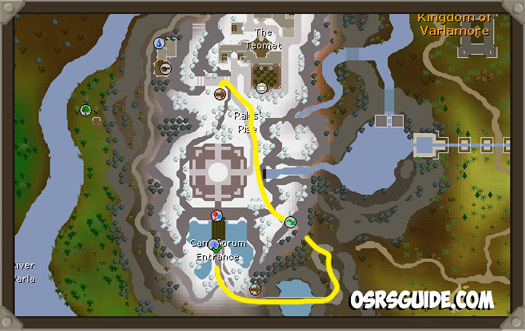
If you don’t have a Quetzal yet, you will need to complete the quest ‘Twilight’s Promise‘ at the center of Varlamore first. Afterward, you can start the quest ‘Perilous Moons’ at the gate of Cam Torum.
How it works
The Perilous Moons quest gets you through your first run, which should give you an idea of how the dungeon works, but here’s a quick recap if it’s been a while or you paid a friend to do the quest for you (I won’t tell anyone).
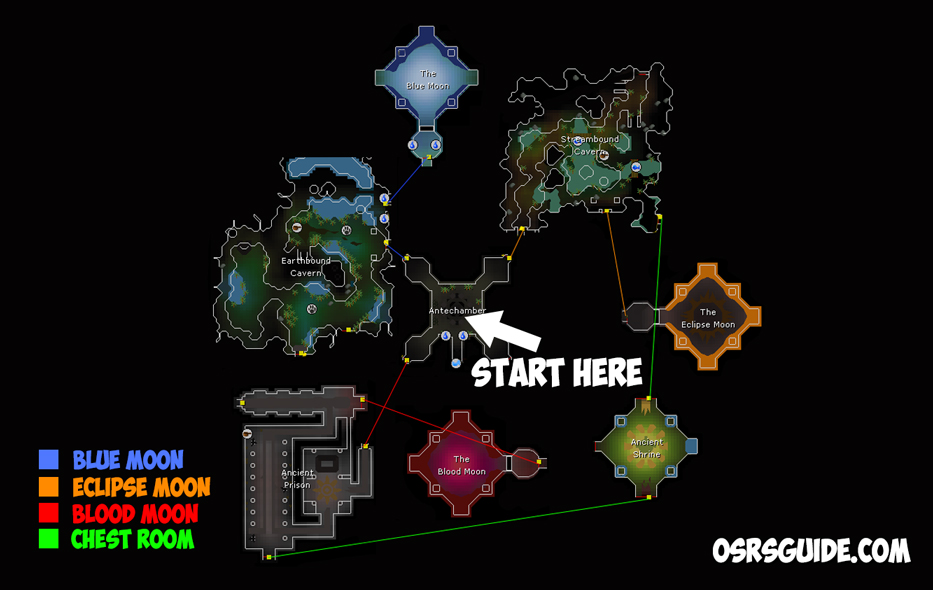
You start each encounter in a central room with 4 gates you can go through. Three Gates will lead to the boss rooms, and the fourth room leads to the chest area.
Before you reach the boss room, you have to go through the resource area of each boss, where you can use skilling to farm supplies, allowing you to continue to endlessly repeat the dungeon without ever hitting a bank!
You are free to fight the bosses in whatever order you like. You’ll notice that other players are also fighting the same boss but they don’t actually do any damage for you. This is because every player has their own ‘health pool’ for the boss. So no other player can impact your loot potential.
This dungeon doesn’t have instances, everything is happening in the overworld, meaning you may enter the boss-room while a special attack is already happening, so always be ready!
After subduing all three bosses, hit up the boss room for your loot, and repeat!
So to recap:
- Start in the central room, you are free to pick which boss to take on first
- Each boss has their own health pool, meaning no other players have an impact on your loot potential
- The bosses are on a continuous loop and never die, so you may enter the boss room while they are performing a special attack
- Finish each run by looting the chest room
Defence-first approach
Moons of Peril is OSRS’ first ‘defense-first’ PVM activity. The reason is that your DPS is impacted by
The Nagua’s basic-attack hits 4 times, and it hits harder the worse your armour is.
Furthermore, your DPS is impacted by how much damage the bosses deal to you.
So it’s SUPER important to bring TANK gear OVER DPS gear.
Gear & Inventory Setup
As defense is key, forget the fighter torso and helm of Neitiznot and bring your tankiest armour instead.
This could be cheap Barrows armour (e.g. Torag) or Justiciar if you can afford it.
Here is the ideal gear order for the helm/chest/legs slot:
Justiciar > Torva > Barrows.
The Blood Moon boss is weak to Slash, the Eclipse Moon is weak to Stab and the Blue Moon is weak to Crush.
So bringing a weapon for each of these combat-styles can be useful.
Your inventory should contain a prayer potion, super combat, and some food. However, you can also farm all of these things in the resource rooms to save on expensive supplies (great for Irons!)
Boss Mechanics
Each boss has 2 special attacks that are unique to them. If you learn to counter these, you should be able to negate all damage from them. Fail do counter them, and you’ll take a lot of damage.
IMPORTANT: A highlighted moon tile always tells you where you should be during the encounter. Standing in this circle will keep you safe. This moon tile rotates clock-wise.
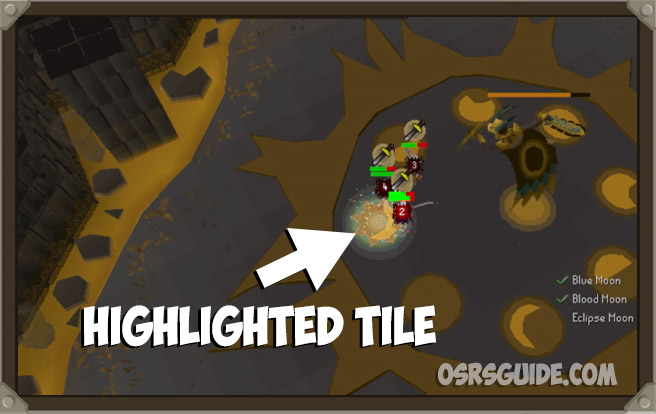
Ignoring this tile will lead to massive damage so always keep an eye out.
Let’s go over the special attack mechanics.
Blood Moon
Weak against: slash (e.g. whip)
Blood Pools
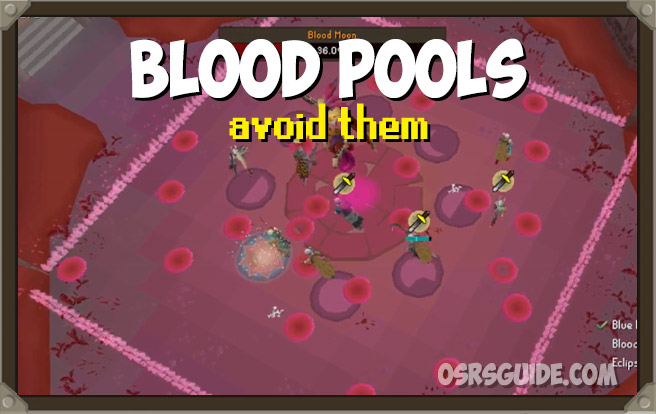
The first special attack spawns pools of blood all over the floor. Just walk around the room and avoid them.
Blood Jaguars

Blood moons second special attack spawns Blood Jaguars. Find the one that’s highlighted for you and attack them.
If you attack any other blood jaguar, you will take MASSIVE damage.
TIP: Avoid all attacks from the jaguar by walking one tile back (blood pools) right before their attack.
Eclipse Moon
Weak against: stab (e.g. Rapier, Abyssal Dagger, Dragon longsword)
Dead dot

During this special, Eclipse Moon stacks you and everyone else in the room in the center and starts spawning from all directions.
You have to quickly click in the direction of the Eclipse Moons that spawn to deflect damage at them. Doing this correctly will avoid all damage to you, and only deal damage to the boss.
Shield Ball

A ball appears on the map, walk behind it to use it as a shield similar to the shield in the Inferno. As long as you stay behind, you won’t be damaged.
Blue Moon
Weak against: crush (e.g. dual macahuitl, sarachnis cudgel, dragon mace).
Frozen Weapons

During this special, ice blocks spawn in the room. Locate the one that’s highlighted for you and attack it. You won’t have your weapon during this special attack.
When ice pillars spawn, click away to a safe tile to avoid all damage.
Braziers
You have to light the two braziers on either side of the boss room. The tornadoes will deal damage and also turn your run off if they hit you so avoid those as much as possible.
Strategy
I’ll be coming out with a strategy video in the next couple of days.
Rewards
Similar to Barrows, at the end of each run you loot a reward chest which has a chance of giving you armour inspired by the three naguas.
Here are the armour sets:
- Bloodrager
- Frostmoon
- Eclipse
For more info on these sets, check out my video below.
Wrap Up
That’s it for this guide on OSRS’ newest mid-game combat encounter! I was really looking forward to this content as I love any update that targets a more casual audience, as opposed to end-game content.
I hope this prepares you for the three bosses and I wish you good luck. Keep in mind this is a day-1 guide and I’m sure the strategies will change, but I will also update this article when it does.