
This 1-99 OSRS Mining Guide covers every method available in the game to help you reach level 99.
For your convenience, I’ve split this guide up into three paths. First is the ‘recommended path’, designed for everyone and tailored for AFK convenience. Many will likely enjoy this route, as it allows you to mine effortlessly on mobile while you’re working or engaged in other activities.
For those pursuing the absolute fastest route to 99, dive into the ‘Fast Mining Path’. Next, we explore alternative mining methods—plausible but not considered ‘meta’.
Additionally, valuable insights are included for ironmen looking to boost their mining skill.
Use the navigation below to jump into your preferred path, or grab a cuppa and take it all in.
Mining EXP Boosters
Here is some information on gear you can obtain to increase your mining exp/hr.
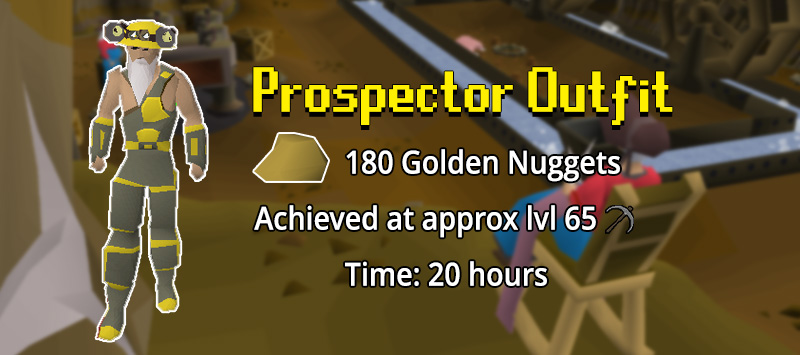
Prospectors Outfit
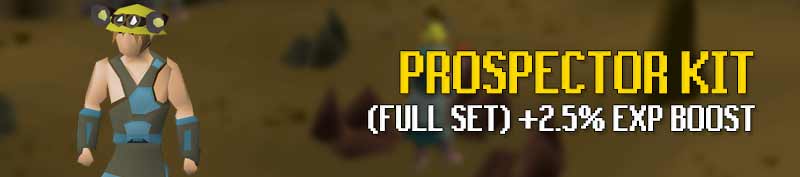
The prospector outfit is the mining outfit equivalent of the Lumberjack, Angler, and other skilling outfits found in osrs.
The Prospectors’ outfit is a reward from The Motherlode Mine and just like its other skilling counterparts gives you a nice 2.5% exp boost when the full prospector set is worn.
Prospector outfit pieces can be obtained from the shop in the Motherlode mine in exchange for golden nuggets which you receive passively while mining at the Motherlode mine.
The additional 2.5% mining experience boost will be very valuable towards getting 99 mining so it’s definitely worth getting, especially since the Motherlode mine (covered in this mining guide) gives very good mining experience per hour.
The full prospector set will cost you 180 nuggets.
Since the Motherlode mine is one of the AFK mining methods that gives great profit/experience per hour obtaining the full set is a no-brainer.
Info on Pickaxes
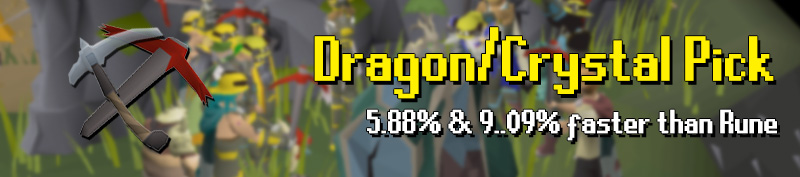
Obviously, you should always use the best pickaxe that your level allows keeping your exp/hr as high as possible. Regular accounts should switch to the Dragon Pickaxe at level 61 provided they have the funds to buy one.
According to the Wiki, the D Pick is 5.88% faster than the Rune Pick.
Players can further upgrade their Dragon Pickaxe into a Crystal Pickaxe after completion of Song of the Elves. The Crystal Pickaxe is 3.03% faster than its Dragon counterpart and has to be charged with Crystal shards.
Celestial Ring
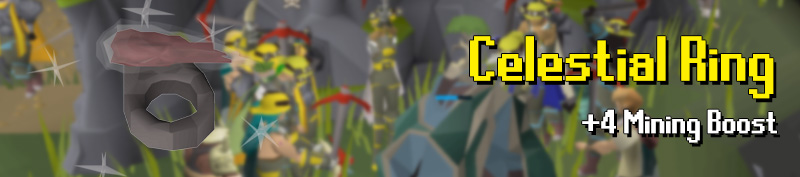
The Celestial Ring is a reward from the Shooting Stars minigame which we cover in the AFK portion of this Mining Guide. This ring can be bought for 2,000 Star Dust (about 2 hour of Shooting Stars) and when worn, offers an invisible +4 Mining level boost, allowing you to gain experience as if your mining level was 4 levels higher.
The Celestial Ring can be charged with Stardust which gives the player a 1/10 chance of obtaining double ores when mining up to Adamant ore.
As the ring is easy to get through one of the most AFK training methods of the game, it’s a no-brainer to grind this one out! Check out our AFK Guide for more info on Shooting Stars.
Varrock Armour
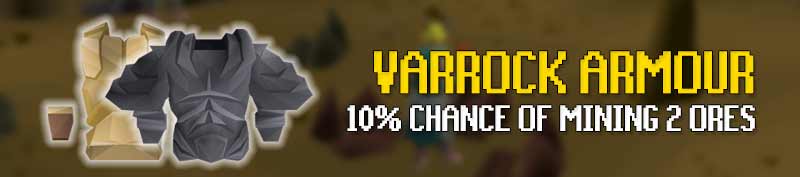
Wearing the Varrock Armour gives a 10% chance of mining 2 ores instead of one. Whenever this effect is triggered, you also gain the experience for the second ore making this a great experience-boosting item to wear while mining.
The Varrock body can be obtained by completing the Varrock achievement diaries. There are 4 different versions for each level of achievement diaries available.
| Varrock Easy Diary | Varrock armour 1 | 10% chance of obtaining 2 ores at once up to Coal |
| Varrock Medium Diary | Varrock armour 2 | 10% chance of obtaining 2 ores at once up to Mithril |
| Varrock Hard Diary | Varrock armour 3 | 10% chance of obtaining 2 ores at once up to Adamant |
| Varrock Elite Diary | Varrock armour 4 | 10% chance of obtaining 2 ores at once (any ore) |
Ores that don’t work with the Varrock armour: motherload mines, blast mines, volcanic mine, dense runestone, shooting stars, and gem rocks.
Mining Gloves

Mining gloves offer a chance of not depleting a rock when worn. These come in 3 variants: Regular, Superior, and expert, and have to be bought with Unidentified minerals. Identified minerals are randomly obtained while mining inside the Mining Guild.
Regular mining gloves cost 60 UM and work up to gold, superior gloves cost 120 UM and work up to Runite, and Expert gloves cost 240 UM and work up to Amethyst.
Here’s a quick table that displays the chance of non-depletion of rocks you get when wearing mining gloves in osrs.
| Silver (regular) | 50% |
| Coal (regular) | 40% |
| Gold (regular) | 33.33% |
| Mithril (superior) | 25% |
| Adamantite (superior) | 16.6% |
| Runite (superior) | 12.5% |
| Amethyst (expert) | 25% |
Recommended Mining Path
Here’s what I’d do from levels 1-99 on any new account. This path prioritizes ‘AFK’ content.
 Quests from levels 1-33
It’s possible to skip levels 1-33 Mining with some the following three quests:
- Doric’s Quest (skips lvl 1-10)
- Plague City (skips lvls 10-18)
- The Dig Site (skips lvls 18-33)
I suggest at least completing the first two, even if you hate questing as they are very quick and have no requirements. The Dig Site has some small skill requirements but it’s such an important quest being part of the Fossil Island series so think twice before skipping it.
Alternative to Questing
Don’t like questing? No biggie, just follow these methods for levels 1-30.
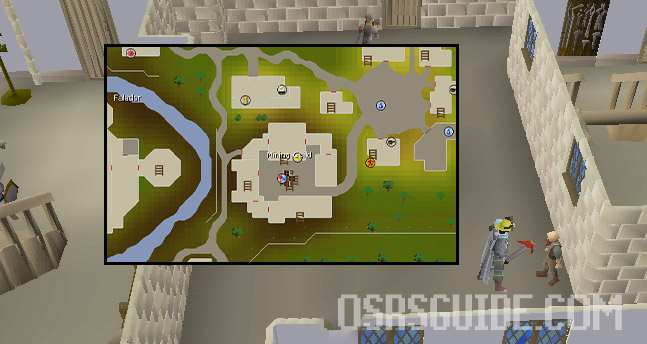
Mining levels 1 – 15 Copper and tin ore
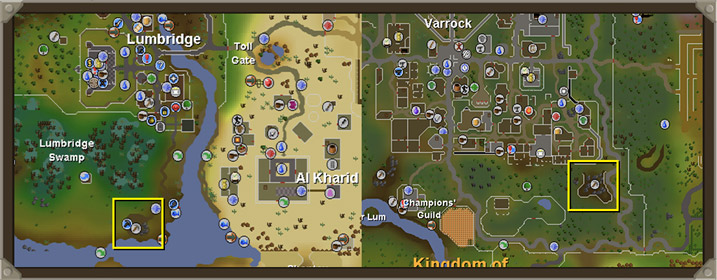
From levels 1-15, mine copper and tin ore in one of the two mines illustrated above.
You can use the mine in the Lumbridge Swamp or the mine Southeast of Varrock.
| EXP Rate: | 10k/hr |
| Approx time: | 20 minutes |
| Best location: | Varrock Mine |
I suggest you drop your ores to avoid the need to bank and speed up these early levels.
TIP: To make dropping ores faster, enable shift-dropping in your settings:
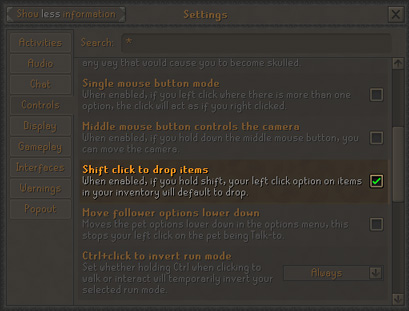
Mining levels 15 – 30 Iron ore
Starting at level 15, mine iron ore until you reach level 30 Mining. It’s advisable to drop your ores once again to expedite these levels. Don’t worry about making money at this stage as you’ll make a good profit once you unlock the Motherlode Mine.
| EXP Rate: | 30k/hr at level 15 |
| Approx time: | 45 minutes to level 30 |
| Best location: | Ardougne Monastery |
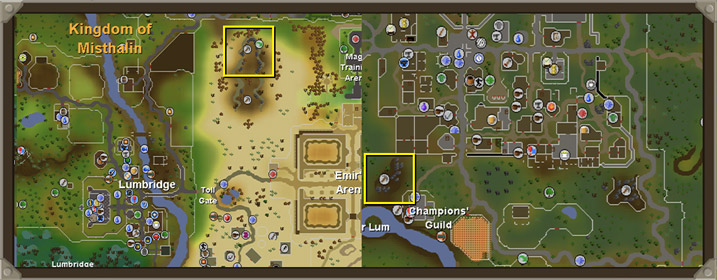
Here are some good locations to mine Iron ore:
- Varrock Mine (chronicle teleport – F2P friendly)
- Al Kharid Mine (Dueling Ring teleport – F2P friendly)
- Rimmington Mine (house teleport – F2P friendly)
- Ardougne Monastery (teleport here via Ardougne cloak)
Motherlode Mine Levels 30-65
After achieving level 30 Mining, you gain access to the first AFK mining activity: The Motherlode Mine.
This is one of the best mining spots in OSRS because it’s low-effort with decent experience rates and also quite profitable for regular accounts. Even for Ironmen, the Motherlode Mine is a solid choice due to the many ores you receive which can be used for Smithing Training.
It’s no wonder that many players choose to stick with this spot throughout their entire mining journey.
EXP Rate:  | 15k/hr at level 30 30k/hr at level 60 45k/hr at level 90 |
| Profit Rate: | 50k/hr at level 30 90k/hr at level 60 300k/hr at level 90 |
| Approx time: | 20 hours to level 65 300 hours to level 99 |
| Location: | Underneath the Falador Party room |
I suggest training here between levels 30-65, at which point you should have accumulated enough Golden Nuggets to obtain the complete Prospector’s Outfit. This will take a total of 20 hours.
While some players opt to stay at this location until level 99, I recommend transitioning to Crashed Stars, as it requires even less effort compared to the Motherlode Mine.
How to get to There
The Motherlode Mine is located underneath the Falador Party room. To go here, enter the staircase East of the Party Room which takes you to the Dwarven Mines. Next, enter the cave entrance just Southwest of the staircase as illustrated.

How it Works
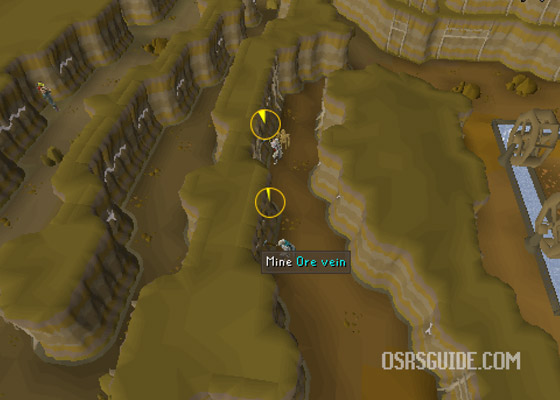
At the Motherlode Mine, you mine Ore Veins which are scattered around the mine.
Once you have a full inventory of Pay-Dirt, deposit it at the hopper located in the center of the mine where it will be cleaned and turned into ores.
Afterward, retrieve your cleaned ores from the ore sack and bank them in the deposit box.
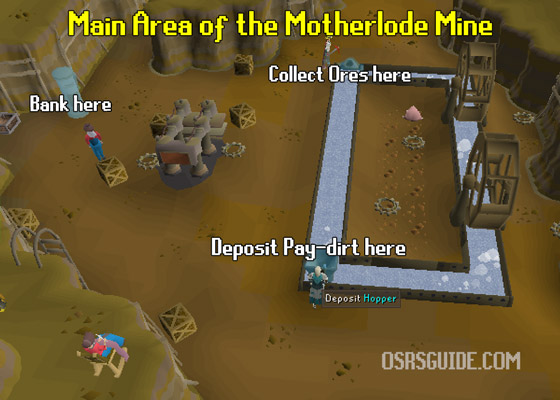
In addition to ores, you’ll accumulate Golden Nuggets while training your mining here.
These Golden Nuggets can be used as currency in Prospector Percy’s shop.
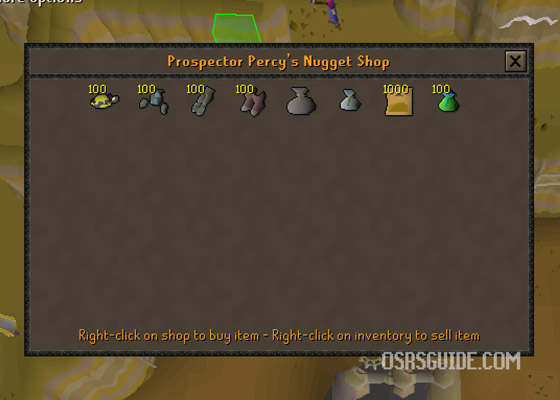
Your initial objective should be the Prospectors’ Outfit, as discussed earlier. This full set provides a 2.5% boost to mining experience when worn and requires a total of 180 nuggets to obtain.
Should you decide to continue training at the Motherlode Mine beyond level 65, don’t forget to unlock the Upper Level upon reaching level 72 Mining.
This upgrade costs 100 Golden Nuggets and can be paid to Prospector Percy.
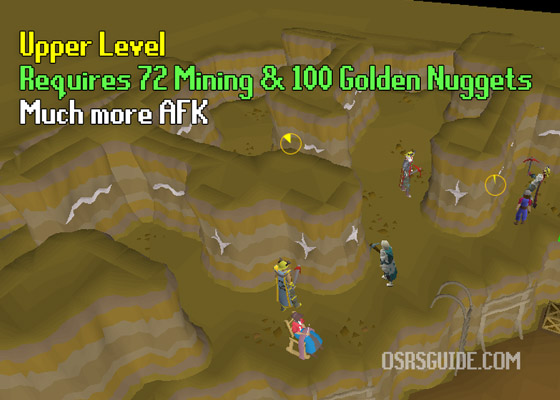
The Upper Level is the best spot in the Motherlode Mine as it is situated in close proximity to both the bank and water circuit. Furthermore, the Ore Veins on this level operate on a time-based system, allowing players to share the veins.
And that’s all there is to the Motherlode Mine… If you need more info, you can check out our Motherlode Mine Guide.
Now let’s delve into an even lower-effort activity: Shooting Stars!
Shooting Stars Levels 65-99
Once you’ve acquired Full Prospectors, typically achieved around level 65 Mining, I suggest exploring Shooting Stars as the most low-effort method to train mining.
If you found Motherlode Mine to be AFK, Shooting Stars takes this concept to a whole new level!
Mining crashed stars requires no banking and each AFK spans for a total of 7 minutes.
The best part? You gain up to 30K exp/hr for barely doing anything.
Crashed stars have emerged as the most popular method for mining training, drawing in accounts of all levels. From complete noobs to maxed accounts on their way to 200M mining experience.
| EXP Rate: | 30k/hr |
| Approx time: | 464 level 99 |
How it Works
Here’s a video I made that explains everything you need to know about star mining.
Crashed Stars are made up of Tiers, with Tier 9 being the highest tier available.
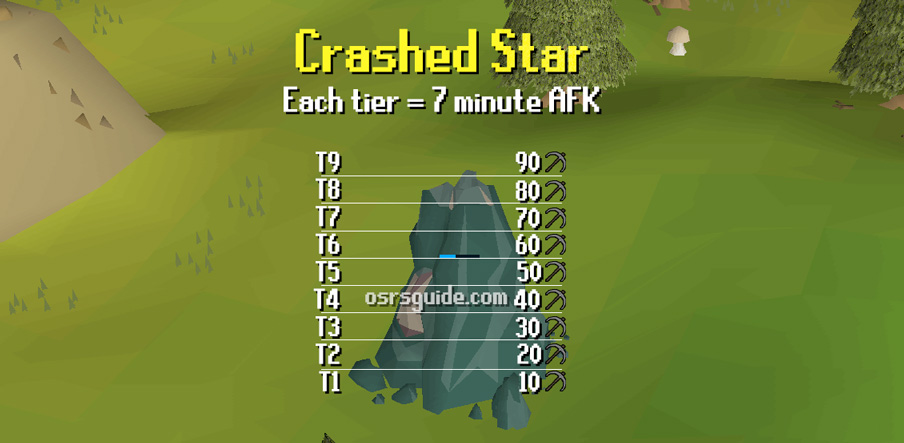
Each tier introduces an additional layer to the star that must be mined down. Consequently, Tier 9 Stars have a total of 9 layers, and each layer corresponds to 7 minutes of AFK mining.
The progression of tiers is level-based, starting with Tier 1 unlocked at level 10 Mining, followed by Tier 2 at level 20 Mining, and continuing in this manner until reaching Tier 9 Stars, which require a Mining level of 90.
At level 65, you will be able to mine tier 6 stars and below. If you stumble upon a higher-tier star by mistake, you can either wait for other players to mine it down to your level or proceed to a lower-tier star.
It’s important to note that tiers don’t affect the amount of experience earned. The experience rate remains consistent whether you’re mining a Tier 9 or Tier 1 layer.
Seems easy enough, but how do I find a star…?
Simple. Head to the Shooting Stars Tracker where you can discover the locations of any stars currently present around Gielinor.

Following that, select a location based on the ‘Tier’ and ease of access to its current location.
For instance, in the screenshot above, I would choose the first location as it currently hosts the highest-tier star and has spawned most recently.
Once you’ve picked a crashed star, travel to the location and start mining.

Now, kick back and unwind while you do other activities such as work, grind on an ALT, watch some Netflix, or play a different game.
Remember to activate your Idle Notifier (Runelite), ensuring you receive a notification every 7 minutes when a new layer has to be mined.
Once you’ve accumulated 2,000 Star Dust, make your way to the upper floor of the Falador Mining Guild. There, trade with Dusuri, to obtain the Celestial Ring, which will provide you with a +4 invisible mining boost.
Continue star mining until you reach level 99 Mining, as it currently stands as the most AFK-friendly method and is widely adopted by many players.
Fastest way to 99 mining
Want to rush 99 Mining, here’s the fastest possible path you can take between levels 1-99 without using tick-manipulation.
| What is Tick Manipulation and why is it not covered? Tick Manipulation is a strategy in which players abuse the game ticks of OSRS to gain enhanced experience rates. This requires a lot of practice, focus, and is extremely click-intensive. Only the sweatiest OSRS players use this method, which is why I don’t consider it necessary to cover it in this guide. |
Here’s an outline of the methods you’ll use:
- Levels 1-15/30 Quests
- Levels 15 – 70 Iron Ore
- Levels 75 – 99 Volcanic Mine
Taking this path, it will take you a total of 165 hours to get to level 99 Mining.
Initial levels
Between levels 1-15, you are free to do quests or mine copper/tin as covered in the recommend path.
Levels 15 – 70 Powermining Iron
Between levels 15-70, you’ll be powermining Iron ore.
| What is Power Mining? Power Mining is a strategy in which you drop your inventory to prevent having to bank. This is sped up by enabling ‘shift-click-to-drop’ in your Control Settings. |
You can expect to gain up to 60,000 experience per hour powermining iron.
| EXP Rate: | up to 60k/hr |
| Approx time: | 15 hours to level 70 |
Between levels 15-60 your best mining location is the Ardougne Monastery.
Once you reach level 60 Mining, you must move to the Mining Guild for the +7 invisible level boost as well as the 2x respawn rate of ores. Here, you can choose to bank your ore or continue power mining until 70.
Pro Tip: using the Dragon Pickaxe special attack, you can enter the Mining Guild at level 57.
Levels 70 – 99 Volcanic Mine
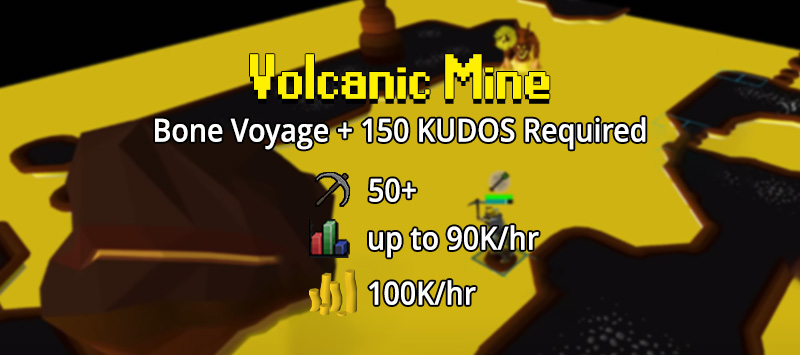
From levels 70-99, the Volcanic Mine minigame offers the best mining experience per hour (excluding tick manipulation).
Players can get up to 90K exp/hr at this minigame!
Now I must mention there is a learning curve to Volcanic Mine, and it’s much easier to do it in small teams, then to go about it solo.
If you don’t have anyone to play with, you can use the Volcanic Mine Discord.
| EXP Rate: | up to 90k/hr |
| Approx time: | 160 hours to 99 |
Requirements
However, there are some requirements. To participate, you must have unlocked Fossil Island (Bone Voyage Quest) and also have a total 150 kudos at the Varrock Museum.
Furthermore, this minigame is not skiller-friendly as you’ll need at least 40 Prayer for protect from missiles and 70+ hitpoints to avoid dying from taking too much damage.
Next, you have the option to solo the minigame or play in a small team.
You’ll also need to pay 30 numulite for each time you start the minigame.
How to find a team
To find a team for Volcanic Mine, join the Volcanic Mine Discord server.
They also have heaps of useful information to prepare yourself to play the minigame, written by players with much more expertise in Volcanic Minethan myself.
You will need to import their Tile Markers into Runelite. To do this, make sure you have the ‘Ground Markers’ plugin for Runelite installed, and then right-click your world map and choose ‘Import Ground Markers’.
My thoughts
I felt like the Volcanic Mine should be included in this guide because it is the fastest way to reach 99 mining. But it does have steep requirements that put people off from doing it. Furthermore, to unlock the best experience rates you really should be doing this content in a small team, which isn’t the ideal solution for many players.
That being said, if you qualify for the minigame, definitely check out the discord I listed above as they have all the info you need to get started and you’ll easily find a team.
For everyone else, check out the alternative methods below, or consider power mining iron to 99, or opt for our recommended path.
Alternative Training Methods
If you ever feel the need for a change from mining Shooting Stars or Volcanic Mine, explore the alternative methods listed below. These approaches demand a higher level of effort and attention but offer increased experience rates per hour and some are very profitable!
Here’s a handy table with information on each mining method covered below.
| Method | Mining Lvls | Effort Level | Requirements | ||
|---|---|---|---|---|---|
| Blast Mine | 75+ | High | up to 70k/hr | 400k/hr | N/A |
| Gem Rocks | 60+ | Medium-high | up to 60k/hr | 600k/hr | Karamja Hard Diary |
| Amethyst | 92+ | Low | 20k/hr | 400k/hr | N/A |
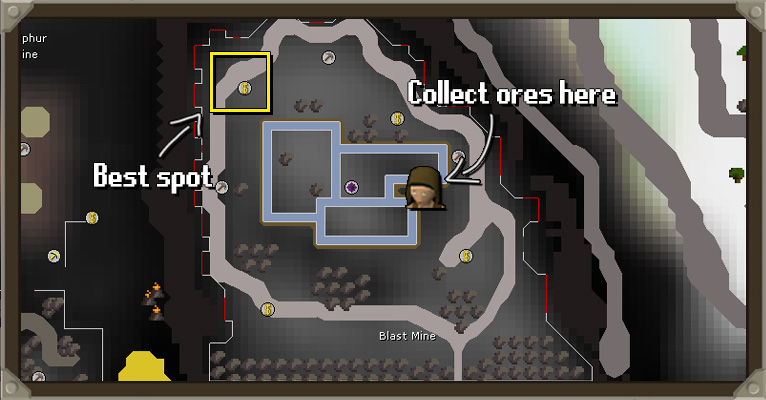
Levels 75 – 99 Blast Mine

One of my personal favorites, but a rather unpopular method, is mining at the Blast Mine.
Starting at level 75 Mining, this becomes a phenomenal training method and money maker.
This training method is only viable at level 75 Mining when you get the chance to obtain Runite Ore as a reward.
| EXP Rate: | 70k/hr |
| Profit per hour: | up to 450k/hr |
| Requirements: | 75+ Mining |
| Approx time: | 170 hours to 99 |
| Location | Lovakengj |
The Blast Mine closely resembles the Motherlode Mine, incorporating a similar water circuit for ore cleaning. The key difference lies in the level of engagement required; the Blast Mine demands constant clicking compared to the relatively low-effort nature of the Motherlode Mine.
However, this additional effort is rewarded, with better experience and profit per hour.
Setup
You’ll need the following items for this activity: a chisel, a tinderbox, and a lot of dynamite.
It’s highly recommended to have full Graceful as you’ll be doing a lot of running. If you don’t have it, you’ll need to use Stamina Potions.
The following items can also be helpful but aren’t as important:
- Dragon Pickaxe (for the special attack, which boosts your mining level)
- Celestial Ring (invisible +4 mining boost)
- Prospectors’ Outfit (you won’t be wearing this while mining, but you will swap to this to collect your ores for the exp drop)
How the Blast Mine Works
At the Blast Mine, you’ll be excavating rocks with a chisel, packing them with dynamite, and subsequently lighting them with a tinderbox.
Following the explosion, you’ll obtain blasted ore, which can be deposited into the ore sack located near the water circuit, mirroring the mechanics of the Motherlode Mine.
Note: if you don’t get out of the Blast Radius in time, you take damage. The strategy below avoids all damage.
Upon completion, collect your ores from the Operator positioned at the center. It’s advisable to switch to your Prospector’s Outfit at this point for the 2.5% experience boost, especially since this is when you’ll receive your experience drop.
Once you’re done, you can collect your ores from the Operator in the center.
At this point, you’ll also get your experience drop, which is why it’s recommended to switch to your Prospectors’ Outfit for the 2.5% exp boost.
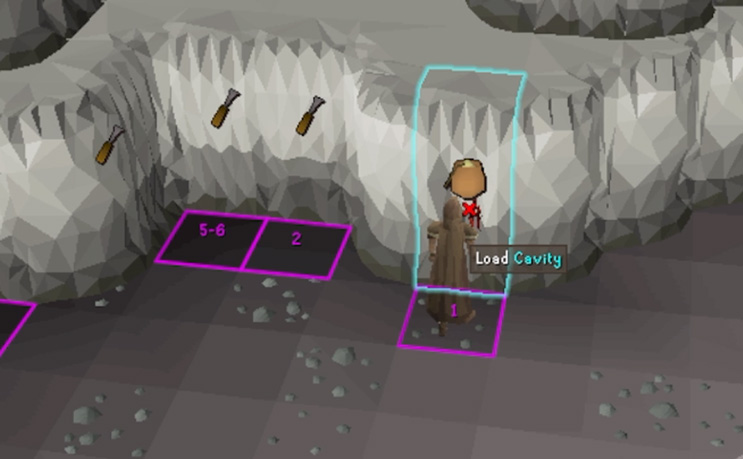
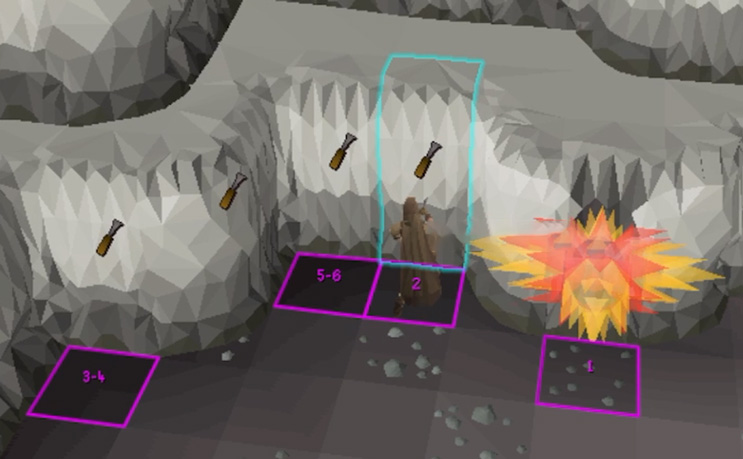
Blast Mine Strategy
There are tons of different strategies on YouTube on how to efficiently do the Blast Mine, but my favorite spot is this area in the Northwestern corner.
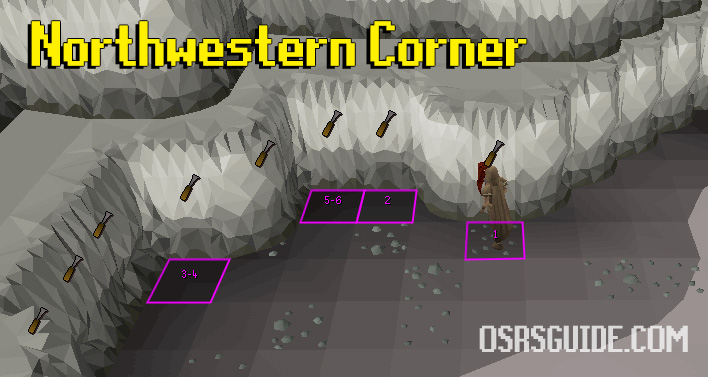
Here’s how it goes:
- Excavate the Rock behind tile 1 first, then place your dynamite, and light it
- Run to tile 2 and repeat the same thing
- Now run to highlighted tile 3-4. Excavate both rocks and place your dynamite but only light it once both dynamites are placed.
- Finally, run to highlighted tile 5-6 and repeat the same process.
Afterwards, pick up the Blasted Ore from tile 2 first, before moving to pick up the ores from 3-4, then run back to 5-6, and finally collect tile 1.
Once you’ve collected all the ores, run to the Ore Sack and deposit them. If you aren’t fast enough, or you forget to deposit them, your ores will vanish from your inventory.
Repeating this process, you shouldn’t take any damage at the Blast Mine while maintaining around 70K exp/hr.
If you wish to use this strategy, you can import my ground markers here:
[{"regionId":5692,"regionX":63,"regionY":45,"z":0,"color":"#FFF100FF","label":"2"},{"regionId":5692,"regionX":60,"regionY":43,"z":0,"color":"#FFF100FF","label":"3-4"},{"regionId":5692,"regionX":62,"regionY":45,"z":0,"color":"#FFF100FF","label":"5-6"},{"regionId":5948,"regionX":1,"regionY":44,"z":0,"color":"#FFF100FF","label":"1"}]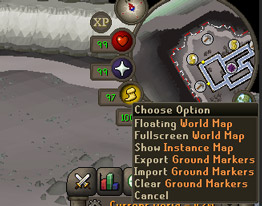
Don’t know how to import Ground Markers? First, ensure your Runelite plugin ‘Ground Markers’ is enabled. Next, copy the code I’ve listed above, and finally, right-click on your world map icon and choose ‘Import Ground Markers’.
To make it easier to learn the Blast Mine, I urge you to enable the ‘Blast Mine’ plugin on Runelite as this will reveal the Blast Radius for you.
Definitely try out this mining method as it’s highly profitable and a good exp/hr. This is also a great way for Ironmen to get Runite Ore at only 75 Mining, but they will need to make their own Dynamite.
Levels 61 – 99 Gem Rocks
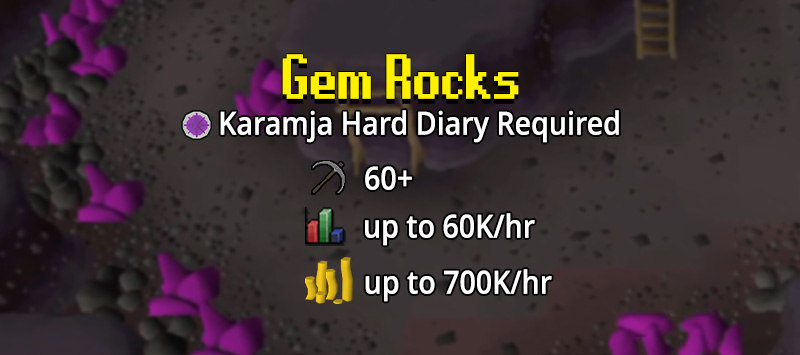
Mining Gem Rocks is a solid alternative training method for those who have completed the Hard Karamja Diary as this gives you access to the underground portion of the Shilo Village mine which has a bank deposit box.
| EXP Rate: | 40k/hr between levels 61-70 50k/hr between levels 70-80 60k/hr between levels 80-90 |
| Approx time: | 215 hours to 99 |
| Best location: | Shilo Village underground Gem Mine |
| Profit per hour: | 400-700k/hr |
This mining method is very profitable for regular accounts and can yield a ton of crafting experience for Ironman accounts.
![]() Ironmen, check out my Ironman Remarks further down in this guide where I’ve calculated the Crafting gains between 60-99 mining.
Ironmen, check out my Ironman Remarks further down in this guide where I’ve calculated the Crafting gains between 60-99 mining.
To get here, use your Karamja Gloves 3 to teleport directly to the Shilo Village Gem Mine.
Levels 92-99 Amethyst
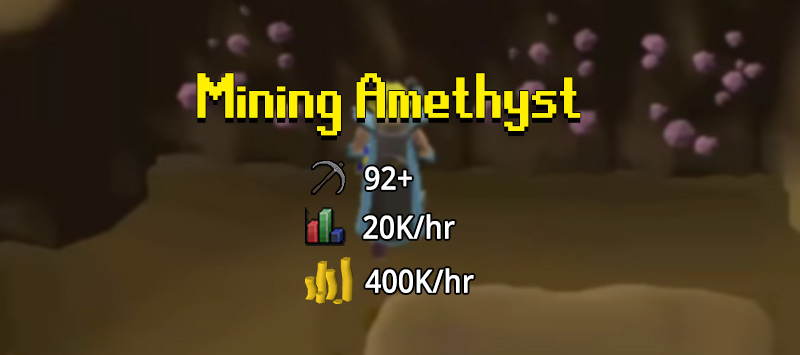
Mining Amethyst is a low-effort method to continue training mining beyond level 92. While this approach boasts the least favorable experience rates among the mining methods covered in this guide, its popularity stems from being an exceptionally profitable way to train the skill.
| EXP Rate: | up to 20k/hr |
| Profit Per hour: | 400k |
| Approx time: | 325 hours to 99 |
| Location: | Mining Guild |
Players can make up to 400k per hour here.
Mining Amethyst between levels 92-99 will profit you a total of 126M. Not bad considering it’s very AFK. However, due to how slow this method is, these levels will take a total of 325 hours.
Ironman Mining Guide
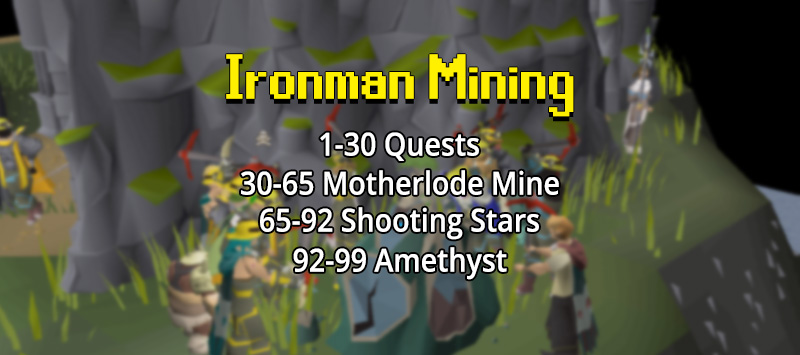
Note: this path prioritizes gathering resources to level the Crafting Skill. I don’t recommend mining for the sake of training your smithing as you can easily train Smithing on an Ironman by buying Gold Ore at the Blast Furnace.
Here’s what I would do from 1-99 mining on an Ironman account:
- Levels 1-30 Quests
- Levels 30-65 Motherlode Mine
- 65 – 92 Gem Rocks
- 92 – 99 Amethyst
Between levels 65 – 92, you’ll obtain a total of 300k Stardust. Which translates to around 2.5M Crafting Experience when spent on Gem Packs. If you wear a glory during this process, you can expect to receive enough gems to add an additional 200k Crafting experience.
Then, between mining levels 92-99, you’ll mine a total of 27,155 Amethyst. To avoid banking, you’ll be crafting these amethysts into Dart Tips with a chisel, earning an additional 1.6M Crafting Experience on your way to 99 Mining.
This should put your Crafting level at around 92.
When fletched into Amethyst darts, you’ll gain an additional 1.6M Fletching Experience.
High-effort Alternative
The path illustrated above uses Shooting Stars which are low effort and still give a good amount of Crafting experience. If you don’t mind high-effort methods, consider doing Gem Rocks from 65-92 Mining for even more Crafting experience.
Doing Gem Rocks instead, you’ll earn a total of 2.6M Crafting experience.
Here’s how I calculated it:
Between levels 65 – 92, you’ll mine a total of 93,342 Gem Rocks.
If we put this in the OSRS Wiki calculator, we have the following output:
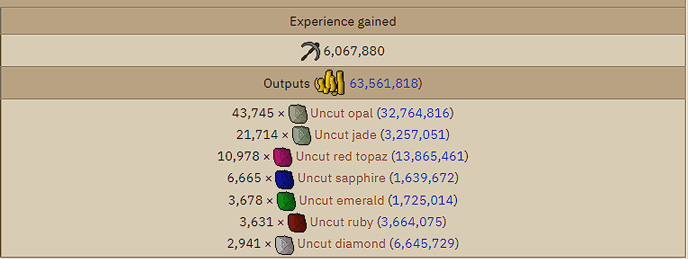
If we put these gems into a table and multiply it with the experience of each gem, we have the following output:
| Gems Mined | Exp | Crafting Experience |
|---|---|---|
| 43745 | 15 | 656,175 |
| 21714 | 20 | 434,280 |
| 10978 | 25 | 274,450 |
| 6665 | 50 | 333,250 |
| 3678 | 67.5 | 248,265 |
| 3631 | 85 | 308,635 |
| 2941 | 107.5 | 316,157.5 |
| Total Experience | 2,571,213 |
Thus leaving you with a nice 2.6M Crafting Experience.
Keep in mind that the effort levels between Shooting Stars and Gem Rocks are miles apart, so I’ll leave the choice to you.
1-99 Mining Summary
I trust that this 1-99 Mining Guide will be a valuable resource in reaching your desired mining level, whether you prefer a relaxed and AFK-friendly approach or a faster-paced but more hands-on method.
Just about every mining method is discussed in this guide, with accurate experience and profit rates for each.
I’ve outlined two paths you can take to level 99: a recommended route, ideal for those seeking an enjoyable AFK experience while working or relaxing, and a faster path for speed runners aiming to achieve 1-99 mining in the shortest possible time.
Feel free to utilize the guide’s insights to craft your personalized mining strategy. Happy mining!
 Construction
 Runecrafting
 Herblore
 Thieving
 Mining
 Crafting
 Agility
 Cooking
 Fishing
 Prayer
 Fletching
 Farming
 Woodcutting
 Firemaking
 Hunter
 Smithing
 Magic
Magic Ranged
 NEW: Sailing
 Combat