

This is an in-depth guide to Chambers of Xerics in OSRS. We’ll cover all the basics including gear setup, stat requirements & recommendations, how to scout raids, how to successfully complete each room as well as how to prepare for the final fight.
This guide is quite long as Chambers of Xeric is considered End Game Content and does come with a learning curve. We’ll first go over the basics before diving into each room. Each type of room comes with its own strategy guide which contains a summary of everything you need to know in case you need a refresher.
Editors Note: as of November 29, 2023, Cox has received Quality of Life updates. You can read about them further down in this article.
What is Chambers of Xeric?
Chambers of Xeric is an end-game bossing activity in OSRS known as a Raid. Chambers of Xeric is often abbreviated as simply ‘CoX’ or ‘Raids 1’ as it was the first Raid to come to OSRS.
During a typical CoX Raid, you complete a number of randomly generated rooms, these are made out of Puzzle and Combat rooms, before taking on the final boss of the raid: The Great Olm.
The main difference CoX has from ToB (Raids 2) and ToA (Raids 3) is that CoX uses randomly generated rooms & forces you to make your own potions while both ToB and ToA have static layouts and the same demi-bosses in every raid.
While CoX is the first raid that came out, this doesn’t mean it’s the easiest one or the first one you should do. ToA is much easier and the invocation system allows you to start at a noob-friendly level while CoX is much more punishing to new players. That being said, CoX is very fun and still a very popular raid!
How to get there
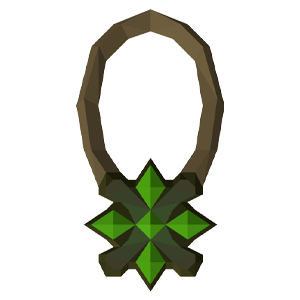
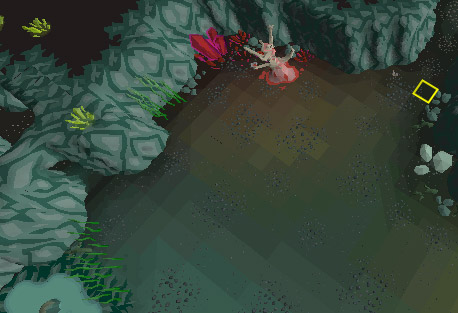
Chambers of Xeric is located on the top of Mount Quidamortem.
Players with 65% Lovakengj Favour can use the Minecart Network to get here easily.
For new players, the easiest way to get here is to use the Mountain Guide to take you there. This guy is located Southwest from the Shayzien Encampment and will take you to the top of Mount Quidamortem provided you have talked to him at the top once before.
To unlock the Mountain Guide, you will have to speak with him at the top of Mount Quidamortem once, meaning you will have to walk all the way there. You can use Fairy Ring teleport D-J-R to get to the Shayzien Encampment and walk all the way to the top by following the yellow path. Once at the top, look for the Mountain Guide and speak with him.
In the future, you will be able to teleport to Fairy Ring D-J-R and follow the green path to get to CoX easily by speaking with the Mountain Guide.
The best teleportation method to CoX is locked behind the Ancient Tablet which is an untradeable drop from Chambers of Xeric. This stone can be used on your Xeric’s Talisman to permanently unlock the Xeric’s Honour teleport which takes you directly to the top of Mount Quidamortem.
How to obtain Xeric’s Talisman
The Xeric Talisman is untradeable and has to be obtained by killing Lizardmen. Since you have to kill Lizardmen to gain Shayzien Favour anyway, you can hit two birds with one stone.
TIP: Complete the Easy Kourend & Kebos Diary to lower the droprate for the Xeric’s Talisman from 1/250 to 1/125.
How CoX Works
Chambers of Xeric is the only type of raid that has randomly generated rooms, for this reason, we always implement a strategy called ‘scouting’ before we enter a Raid. Scouting allows us to target efficient layouts and also avoid certain demi-bosses not suitable for learners. More on scouting later.
While inside the raid, you won’t have access to your bank. You will however have access to a private storage box where you can store items for safekeeping. Later in the raid, you will also make a shared storage box for your team.
Every CoX raid consists of the following:
- Resource room where you can farm, fish, cook, & make potions
- Room with Scavengers which drop herblore secondaries
- X amount of Puzzle Rooms
- X amount of Combat Rooms
- The Great Olm (Final Boss)
You have to complete each room in order before you can take on the Great Olm. Before going into Olm, we go through this phase called the ‘prep phase’ in which we farm secondaries from scavengers & make enough potions before the fight.
Certain dem-bosses also drop potions and herbs which makes the prep phase faster.
You gain points for completing rooms & killing Olm while you lose points for dying in the raid. The majority of the points are earned during the Olm fight. In the end, your points will determine your chance at a unique drop.
For every 8,675 points you have at the end of the raid, you get a 1% chance at the unique drop table.
That’s all there really is to Chambers of Xeric. As long as you meet the requirements, and come with a decent gear setup, prepared to learn and make mistakes, you will be just fine!
 CoX Requirements
Here are the minimum requirements for Chambers of Xeric:
It’s possible to start raiding with these minimum requirements but 85+ combat stats are recommended.
You will also need one player in your team with 90 Herblore that can make Overload potions.
Furthermore, you will need to have the gear to bring switches in the three combat styles: Melee, Ranged & Magic.
TIP: You can quickly level up your combat by training AFK at The Nightmare Zone.
 CoX Recommended Stats
Here are the recommended stats for Chambers of Xeric:
- 85+ Attack
- 85+ Strength
- 85+ Defence
- 85+ Magic
- 85+ Ranged
- 77+ Prayer with Rigour and Augury unlocked
You will also need to have the following stats in your team:
- Member with 55+ Farming
- Member with 90+ Herblore (who makes Overload+)
It’s possible to do raids with just 78+ Herblore and just make regular Overloads but your DPS will be far worse.
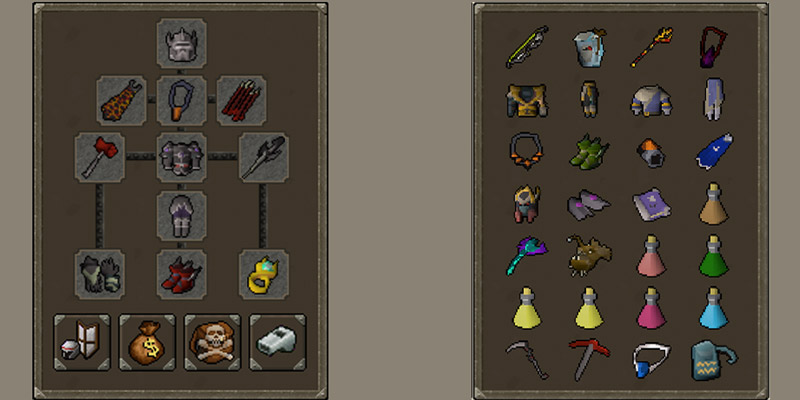
 Gear Setup for CoX
In this section of the CoX Guide, I’ll go over the complete gear setup including the minimum gear requirements, example gear setups & gear progression ladder.
Minimum Gear Required
The following weapons are considered essential for Chambers of Xeric:
- Tentacle Whip
- Toxic Blowpipe
- Trident of the Swamp

Not having access to these weapons will make raids infinitely harder, especially for a learner. Without these items, you will also have a hard time finding a team to take you with them if you don’t already have a group to go with.
![]() Ironman recommendation: Train your slayer until you unlock Kraken (87 Slayer, unboostable) & grind out Zulrah until you get the Blowpipe before coming to Chambers of Xeric.
Ironman recommendation: Train your slayer until you unlock Kraken (87 Slayer, unboostable) & grind out Zulrah until you get the Blowpipe before coming to Chambers of Xeric.
You will also need to have access to the following gear:
- Barrows Gloves
- Fighter Torso
- Berserker Ring (i)
- Amulet of Fury
- Salve Amulet (ei)
- Occult Necklace
- Fire Cape
- Imbued God Cape
- Dragon Defender
- Bandos Godsword

Plenty of these items are untradeable so you may have to do some grinding if you don’t already have them. However, the items on this list are pretty much essential to the game so you should have gotten them even if you don’t want to raid.
It’s possible to skip Barrows Gloves/Fighter Torso and come with a void setup as a learner, but generally void (even elite void) is not recommended.
Example Gear Setups for CoX
Minimum/Budget Gear Setup
Here’s the minimum gear setup for CoX:
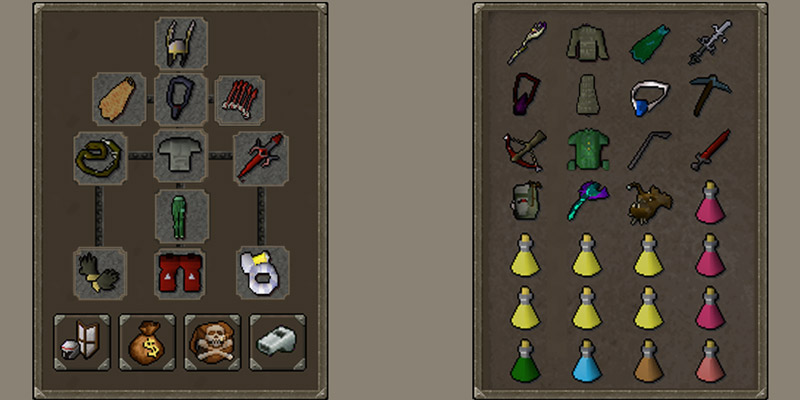
- Helm of Neitiznot
- Fire Cape
- Amulet of Fury
- Ruby Dragon Bolts (e)
- Tentacle Whip
- Fighter Torso
- Dragon Defender
- Blessed Chaps
- Barrows Gloves
- Dragon Boots
- Berserker ring (i)
![]() Ironman notes:
Ironman notes:
- Swap out Ahrims for Mystics if you haven’t completed your Barrows Grind.
- Swap out Blessed D’hide with Black D’hide if you haven’t been lucky with clues
- Swap out Dragon Crossbow for Rune Crossbow with Ruby Bolts (e)
As this is the minimum gear setup, any downgrades from here are considered unacceptable if you hope to find a team.
Medium Gear Setup
The following items are considered essential upgrades from the minimum gear setup:
- Rigour (31M)/Augury Prayer (3M)
- Serpentine Helm (2.5M)
- Lightbearer (3.5M)
- Necklace of Anguish (14M)
- Dragonhunter Lance (42M)
- Twisted Buckler (14M)
- Tormented Bracelet (10M)
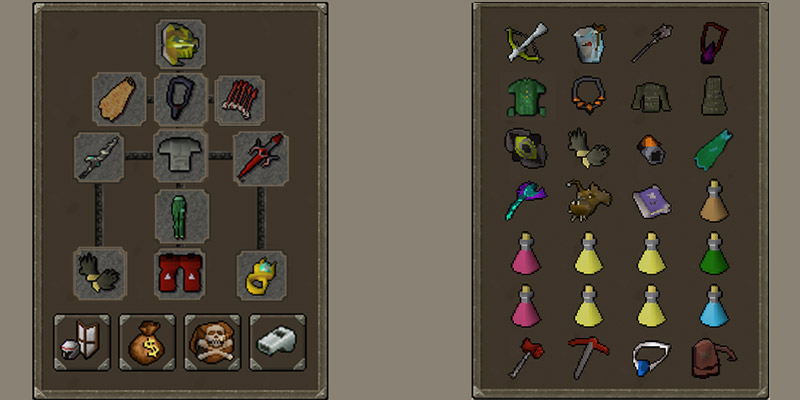
Once you have the above-mentioned upgrades, you can consider upgrading the following to complete your medium gear setup:
- Dragon hunter crossbow
- Sanguinesti Staff
- Dragon Warhammer
- Dragon Pickaxe
Max Gear Setup
Here’s an example of a max gear setup at CoX.
This setup involves using Best in Slot Melee/Ranged/Magic weapons: Scythe, Twisted Bow, Shadow of Tumeken as well as best-in-slot gear: Full Torva/Full Masori (f) & Ancestral Robes.
Best-in-Slot Gear for CoX
Here’s some extra gear info for CoX for each gear-slot. This section is ranked starting with the Best-in-Slot option.
Use this only to make choices on potential upgrades, learners should stick to the minimal/medium gear setup. [skip section]
 Helm Slot
Melee:
- Torva Full Helm
- Inquisitors’ Great Helm
- Neitiznot Faceguard
- Serpentine Helm
- Helm of Neitiznot
- Void Melee
Ranged:
- Masori Mask
- Armadyl Helmet
- No helm switch
Magic:
- Ancestral Hat
- No helm switch
The helm slot prioritizes melee, you can bring ranged/magic switches such as an Ancestral Hat & Masori/Armadyl helmet once you have the funds & skills to do so.
 Cape Slot
Everyone should bring a switch for the cape slot for each combat style.
Melee Switch:
- Infernal Cape
- Fire Cape
- Ardy Cloak 4
- Myth Cape
Ranged Switch:
- Ava’s Assembler
- Ava’s Accumulator
Magic Switch:
- Imbued God Cape
- God Cape (though you really should upgrade)
 Amulet Slot
Melee Switch:
- Amulet of Torture
- Amulet of Fury
Ranged Switch:
- Necklace of Anguish
- Amulet of Fury
Magic Switch:
- Occult Necklace
- Amulet of Fury
The Amulet of Fury is a solid choice for learners as it has offensive bonuses for all attack styles & good defensive bonuses. Even when running a Fury, consider buying an Occult Necklace for the +10% Magic Damage as it only costs about 550k.
 Ammo Slot
The Ammo slot is reserved for your Ranged Setup unless you aren’t bringing a crossbow/twisted bow.
- Dragon Arrows
- Ruby Dragon Bolts (e)
- Ruby Bolts (e)
- Rada’s Blessing 4
- God Blessing
 Weapon Slot
Melee:
- Scythe of Vitur
- Dragonhunter Lance
- Osmunten’s Fang
- Ghrazi Rapier
- Abyssal Tentacle
Ranged Switch:
- Twisted Bow
- Dragonhunter Crossbow
- Zaryte Crossbow
- Armadyl Crossbow
- Toxic Blowpipe
Magic Switch:
- Tumekens’ Shadow
- Sanguinesti Staff
- Trident of the Swamp
 Body Slot
Melee:
- Torva Platebody
- Inquisitors’ Hauberk
- Bandos Chestplate
- Fighter torso
- Elite void top
Ranged Switch:
- Masori Body
- Armadyl Chestplate
- Blessed body
- Elite void top
Magic Switch:
- Ancestral Robe top
- Ahrim Robe top
- Elite void top
 Shield Slot
Melee:
- Avernic Defender
- Dragon Defender
Ranged Switch:
- Twisted Buckler
- Dragonfire Ward
Magic Switch:
- Book of the Dead (thralls)
- Tome of Fire
- Elidinis’ Ward (F)
- Arcane Spirit Shield
 Leg Slot
Melee:
- Torva platelets
- Inquisitors’ platelets
- Bandos Tassets
- Blessed Chaps
- Elite Void Robe
Ranged Switch:
- Masori Chaps
- Armadyl Chainskirt
- Blessed Chaps
- Elite Void Robe
Magic Switch:
- Ancestral robe bottom
- Ahrim’s robe
- Elite void Robe
 Gloves Slot
- Ferocious Gloves (melee only)
- Barrows Gloves (melee/ranged/magic)
- Tormented Bracelet
A tormented Bracelet switch for Magic is 100% recommend if you have the funds.
 Boots Slot
- Primordial Boots
- Dragon Boots
If you can afford it, bring a Pegasian Boots switch for Ranged. Otherwise, just stick to your Primordials for all combat styles.
 Ring Slot
- Lightbearer
- Berserker Ring (i)
- Brimstone Ring
With the arrival of Tombs of Amascut, Lightbearer has become the B-I-S ring slot. While it doesn’t offer any offensive bonuses, it doubles the rate at which your special attack charges meaning you can do 2 special attacks at the start of each Olm Phase instead of 1.
Special Attack Weapon
- Dragon Warhammer
- Bandos Godsword
 CoX Inventory Setup
In your inventory you should have the following:

- Magic Switches: Occult, Mystic/Ahrims, Trident, Imbued God Cape
- Ranged Switches: Accumulator/Assembler, Blowpipe, Dragon Crossbow, Blessed D’hide top/black d’hide top
- 1 Anglerfish
- 1 Super Combat
- 1 Ranging potion
- 1 Stamina Potion
- Saradomin Brews
- Super Restores
- Room-specific items (depending on the raid layout)
Here are the room-specific items to bring:
- Dragon Sword (for VASA)
- Pickaxe (for Guardians)
- Lockpick (for thieving room)
- Rune pouch with ice barrage (muttadiles)
- Salve Amulet (ei) (for Mystics)
How to start a CoX Raid
To start a raid, you must be the leader of a chat channel (yellow smiley faces). Other players can join your chat by typing in your name.
Once your team has joined your chat, all of you must enter the Chambers of Xeric. As the team leader, only you can start the raid. Once the raid has started, nobody will be able to join.
Make sure to give one of your teammates the rank ‘general’ so that the raid doesn’t disband if you disconnect.
Note: Players do not have to be inside your chat channel while you are scouting, but they do have to be in your chat channel and inside the chambers when you start the raid.
Scouting

Scouting has become far more relaxing after the QOL update from September 29, 2023.
Since Chambers of Xeric is a randomly generated raid, you always get a different raid layout. Sometimes you get rooms that you otherwise don’t, and sometimes you get rooms that you don’t want because you don’t have the gear or the stats/skills.
To ensure you always have a raid that your team can do (when learning) and is also efficient in terms of points/hr (once you start to get the hang of things), we use a strategy known as scouting.
It’s very simple: you enter the chambers of Xeric after making a team and if you don’t like it, you right-click reload on the stairs in the lobby to refresh the layout. Until you get a room layout that fits your preferences.
Scouting is made even easier with the Runelite Plugin ‘Chambers of Xeric’, as it reveals which rooms are inside your raid through an overlay. This plugin is installed on Runelite by default. Just look it up to ensure you have it toggled on. You can also mark rooms you don’t want.
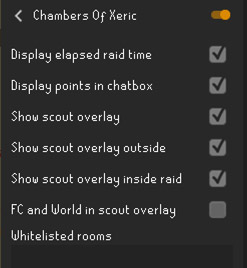
Sometimes rooms will be labeled ‘unknown’ meaning they will be a surprise. Unknown puzzle rooms are fine, but you should avoid unknown combat rooms as a learner.
How to Scout Raids
To start scouting, simply enter the raid after making your team. Your Runelite plugin will reveal which rooms are in the Raid through an overlay. If you don’t like the raid, right-click reload on the staircase to refresh.
Ideally, every member of your team should make their own team and scout so that you find your preferred room layout as fast as possible.
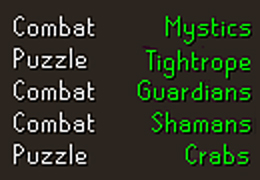
Ideal CoX Raid Layout
The Raid layout you want to look for is a 5-room raid with 3 combat rooms and 2 puzzle rooms. This is the minimal amount of rooms you can get and allows you to quickly complete them.
Best Puzzle rooms:
- Tightrope
- Crabs
Both tightrope and crabs are very fast so these are the preferred puzzle rooms. Ice Demon and Thieving are fine, but take more time.
Best Combat rooms:
The following combat rooms are super easy:
- Mystics
- Guardians
- Shamans
- Mutadiles
As a learner, we advise you to try to find raids that only include the above-mentioned combat rooms in combination with any 2 puzzle rooms.
Below is an example of the best kind of scout you can get.
Once you start getting the hang of things, you can start learning Tekton and Vasa. And once you have mastered those two, you can try learning Vespula and Vanguards.
But for the time being, add Tekton, Vasa, Vespula, and Vanguards to your blocklist in the Runelite Plugin.
Chambers of Xeric Puzzle Rooms
Tightrope room

This room requires the person with the highest Agility Level to cross the rope and obtain the keystone. However, before you cross, you should kill the 2 Magers and 2 Rangers located on each side of the tightrope.
Both the Magers and Rangers can be safespotted allowing you to avoid a lot of damage.
The magers should be killed first as they have the lowest defence.
Tightrope Strategy

- DON’T CROSS ROPE UNTIL ALL OPPONENTS ARE KILLED
- Attack Magers (one at a time):
- Ranged Gear
- Sip Ranging pot
- Prayer: Protect from Magic & Rigour/Eagle Eye
- Then Attack Rangers (one at a time):
- Magic Gear
- Prayers: Protect from Ranged & Augury
- One person crosses tightrope when only one ranger is left. Use Keystone crystal on the door.
Crabs Room

This is the only puzzle room that requires you to actually use your brain as you would expect from a puzzle room. It’s a bit tedious to learn this room, but once you’ve mastered it you’ll breeze through them.
This room has 4 colored crystals in them which need to be turned white. There is also a carved sculpture that spits out an orb that will traverse the room. Your job is to use the crabs to bounce the orbs onto the crystals and turn their color to white.
Some important notes:
- Don’t run into the orb it hits hard!
- Use protect from melee to avoid damage
- Use crabs to bounce the orb & change its color
- Bounce always is clockwise
- Crabs retain color for only 5 seconds so hit them right before the orb will bounce
- Crabs can be stunned for 20-30 seconds using a hammer, doing this turns temporarily turns them RED
- You only need 3 crabs to complete the room (one for each combat style)
Here’s a chart with each crystal color and its corresponding attack style:
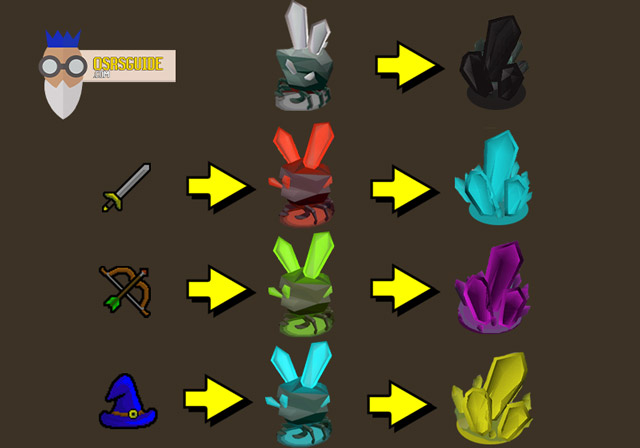
| Crystal Color | Orb Color | Combat Style |
|---|---|---|
| Black Crystal | White Orb | None (default color) |
| Yellow Crystal | Blue Orb | Mage |
| Blue Crystal | Red Orb | Melee |
| Purple Crystal | Green Orb | Ranged |
If you don’t have a hammer to smash crabs, one spawns at the entrance of the puzzle room.
Video Guide
Here’s a quick video guide to help you get familiar with this room.
Ice Demon Room

Ice Demon is a simple puzzle room featuring a boss that needs to be defeated to access the next room. However, the ice demon cannot be damaged as it is protected by the cold. To circumvent this, we need to warm up the room which is I guess what makes this a puzzle room.
To warm up the room, you need to chop sapling and toss their kindling in the 4 braziers inside the room.
Notes:
- The room contains a private storage. Use this to bank your inventory. When re-gearing, use the WITHDRAW ALL option.
- The blue/green bar above the ice demon indicates how much the ice demon has thawed
- Always pray for missiles during the fight to force him to use snowball attack
- Run in a 3×3 square while attacking to prevent damage from snowball attack
- The further you are from the ice demon, the more time you have to dodge the snowball attack, which is why we use crossbow during Ice Demon instead of Blowpipe
Ice Demon Strategy

- Bank inventory in private storage & pick up axe/tinderbox
- Chop the saplings until you have a full inventory of kindling
- Toss kindling in braziers & light at the same time
- Shift-drop axe/tinderbox & withdraw all from private storage
- Equip Ranged Gear (crossbow) & sip Ranging Potion
- Prayers: Ranged/Rigour
- Attack Ice Demon. Dodge snowball attacks by continuously moving 2 tiles away.
Extra:
- Players with DWH spec Ice Demon before switching to Ranged Gear
Thieving Room

The Thieving Room is a room full of chests and a Corrupted Scavenger blocking our way. To clear this room, open the chests and feed the Corrupted Scavenger with the Cavern Grub found in the chests. Once asleep, you are done with the room.
During team encounters, players should start feeding the Scavenger once they have half an inventory of Cavern Grub collected. Once fed, continue collecting more grub to feed the scavenger until he falls asleep.
For Solo CoX, you need 30 grub to put him to sleep. Teams need a random larger amount.
Some important notes:
- Bringing a lockpick speeds up this room
- You can re-open chests to get more grub
- 3 chests contain poison, don’t open these again
- One random chest contains Psykk Bats which gives you extra points
- If the scavenger doesn’t eat for a full minute, it starts healing
Thieving Room Strategy

- Bank your inventory in private storage
- Steal half inventory of grubs from chest & feed scavenger
- Then continue to loot chests & feed scavenger until room is finished
Chambers of Xeric Combat Rooms
Skeletal Mystics Room

Mystics room is pretty straightforward. The room contains 3 or more Skeletal Mystics who have to be killed one by one. Since they are undead, the Salve Amulet (ei) is best in slot here.
Focus on one mystic at a time, pray mage, and use ranged to kill them.
Skeletal Mystics Strategy

- Equip Ranged gear + crossbow + salve amulet (ei)
- Sip your Ranging pot
- Prayers: Protect from Magic & Rigour
- Kill Mystics one by one
Guardians Room

The Guardians Room is a room with two statues blocking the way. These can only be damaged with a pickaxe. Crystal/Dragon Pickaxe is best-in-slot but a Rune pickaxe also works for ironmen.
The Guardians attack with melee and also a missile attack. You can avoid damage by running 2 tiles away as soon as hit the guardians (a strategy known as flinching).
Guardians Strategy

- Equip Dragon or Rune Pickaxe & melee gear
- CHECK your attack style is set to SMASH
- Sip Stamina Pot & Super Combat
- Prayer: Piety
- Flinch the Guardians by running 2 tiles away as soon as you hit them
Lizardmen Shamans Room

This room contains 2 or more shamans depending on your raid size. These Lizardmen Shamans are identical to the ones you can farm to obtain the Dragon Warhammer so if you have killed them before, you already know the strategy.
Protect from Missiles and use Ranged to attack them. Keep moving to dodge the poison spits.
Important notes:
- Poison spit can deal up to 40 damage
- To avoid poison spit, move away 3 tiles as soon as you see the green ball coming towards you
- Use crossbow or Twisted bow/bofa NOT blowpipe
- Sanfew Serum is necessary if you don’t have Serp helm
Lizardmen Strategy

Checklist:
- Gear: Ranged gear + Crossbow
- Potions: sip Ranging Pot & Sanfew Serum
- Prayer: Protect from missiles + Rigour
Strategy:
- Hug the walls when attacking shamans, and AVOID the middle of the room
- Run three tiles away whenever you see the poison spit attack
- Avoid purple minions
Muttadiles Room

The Muttadile room contains a baby and mother muttadile (mother hides in the water) as well as a meat tree.
Once the baby is killed, the mother will come out from the water.
Muttadiles can heal from the meat tree. You can prevent the muttadile from healing by chopping down the meat tree or by freezing them using Zamorak Godsword or Ice Barrage.
Chopping down the meat tree is a solid strategy as it allows you to clear this room without having to deal with the muttadiles healing after you miss a freeze (which does happen). Since no axe spawns, you do need an axe in your inventory for this strategy.
Notes:
- Run to the corner as soon as the baby muttadile dies to avoid a melee attack from the mother which can one-hit you
- Chop down the meat tree BEFORE the mother spawns if you plan to use this strategy
- Use Protect from Missiles while in the room
- Use Protect from Melee if the baby is within melee distance
- The big muttadile can be safespotted in some room layouts
Muttadiles Freezing Strategy

Checklist:
- Gear: Ranged gear + Blowpipe
- Potions: sip Ranging Pot
- Prayer: Protect from missiles + Rigour
Strategy:
- Attack the baby muttadile first
- Ice barrage when baby muttadile is at 40% HP, then kill it
- Freeze the large muttadile when it reaches 50% HP (ZGS beats Ice Barrage)
- Avoid melee distance or you will get one-banged
Muttadiles Chopping Strategy (alternative)

- This strategy requires an axe to be brought inside (bring a cheap one, you’ll drop it)
- Must have HIGH woodcutting levels (70+)
- Equip Ranged Defence + Trident & Occult Necklace
- Use Protect from missiles/switch to melee when baby comes within melee range
- After each woodcutting exp drop, hit the baby muttadile. (stop hitting once they reach 50% health)
- Once the meat tree is gone, finish baby muttadile
- Then either lure big muttadile to safespot or kill it without getting in melee range
Safespots
Some room layouts have safespots for the Big Muttadile as they are quite large. Here’s an example of such a safespot.
Vasa Nistirio Room

The Vasa Room consists out of Vasa Nistirio and 4 crystals. This demi-boss requires the use of two combat styles: ranged and melee. With the former requiring a STAB weapon. You’ll be using Ranged to kill the boss, and use a Melee Switch with STAB weapon to damage the crystals inside the room.
Notes:
- Use a STAB weapon to damage the crystal and make sure your combat style is also set to STAB. Budget setups include Abyssal Dagger or Dragon Sword.
- Move towards the next crystal as you are attacking Vasa
- Don’t ever stand underneath Vasa
Tekton Room

Tekton is a melee-based demi-boss with high defence that only attacks in the direction he is facing. Because of this, you can run circles around him to prevent most damage.
Tekton has two phases indicated by his aura:
- Orange Aura: lower hits and lower defence
- Red Aura: higher hits and higher defence
Special attacks should always be used during the Orange Aura to prevent splashing.
When first entering the room, Tekton will be working on his anvil. One person will have to go in and lure Tekton as far away from this anvil as possible.
The main strategy to beat Tekton involves syncing up with your teammates while moving counter-clockwise in between hits. This method has one flaw: after 10 or more attacks Tekton will return to his anvil if he doesn’t spot anyone.
When he moves back to the anvil, make sure you don’t get caught underneath him or you will take massive damage. Once he is back at the anvil, he will start healing himself and missiles will start flying around the room. These missiles can be avoided by moving two tiles away continuously. All players should be spread out during this phase.
Since Tekton has high-defence, you absolutely have to start off with Dragon Warhammer or Bandos Godsword specs. If your team doesn’t have these available for whatever reason, definitely consider skipping Tekton.
Notes:
- Use Protect from Melee
- 1 Person should lure Tekton as far away from the anvil as possible
- Sync with your teammates and move counter-clockwise around Tekton
- Continuously move 2 tiles when Tekton is at anvil
- Don’t ever stand underneath Tekton
Here’s a strategy to beat Tekton.
Vanguards Room

This room contains 3 Vanguards: a melee vanguard, a ranged vanguard, and a magic vanguard. These vanguard have a healing mechanic that triggers whenever one of them has 33.3% less health than the other two. When this happens, ALL vanguards heal to full hp.
For this reason, it’s important to keep all Vanguards at around the same HP. Meaning your team will have to split up and attack individual vanguards using an attack style they are weak towards (chart below).
| Melee Vanguard | USE MAGIC (e.g. Trident of the Swamp) |
| Magic Vanguard | USE RANGED (e.g. Blowpipe) |
| Magic Vanguard | USE MELEE (e.g. Tentacle Whip) |
Teams with more than 3 players can assign a chaperone whose sole task is to even out the damage between the vanguards.
Notes:
- Avoid Vanguards as a learner
- Use the correct attack style
Here’s a guide on how to easily clear the Vanguards room.
Vespula Room

This room contains Vespula, 4 lux grubs, and an Abyssal Portal. The goal is to destroy the Abyssal Portal. The most common strategy for this room is the Redemption strategy which focuses on damaging the Abyssal Portal while running in and out with Redemption prayers. This strategy takes practice and requires a minimum of 90 Hitpoints.
Vespula room should be avoided by all learners until they have mastered all the other rooms.
Notes:
- Avoid Vespula raids as a learner
- Sanfew Potion or Serp Helm is a must to avoid poison
- Redemption method is best but requires 90 hitpoints
Below is a quick guide on how to do the Redemption method which is the best strategy to beat the Vespula room.
Preparation for Olm

Potion Making Phase
Before we face The Great Olm, we’re going to need to make some potions in the resource room.
Potion-making inside CoX is similar to potion-making in the main game. First, grab Empty Gour Vials from the four tree in the resource room & fill them with water using the geysers. Then add the main ingredient (e.g. Buchu leaf), followed by the secondary ingredient (e.g. Stinkhorn Mushroom).
Some potions (e.g. Twisted, Elder, Kodai, Revitalisation & Overload) have weaker and stronger variants. Which variant you make, depends on your herblore level.
You need 70 herblore to make Elder(+), Kodai(+),Twisted(+), 78 herblore for Revitalisation(+) and 90 herblore for Overload(+). This is why it’s recommended to have one teammate with 90 herblore.
Ironman have to make their own potions & should have at least 78 herblore when starting their CoX grind, allowing them to make Revitalisation (+) and standard overloads.
Here’s a chart with each potion and its ingredients:
| Potion | Main ingredient | Secondary Ingredient |
|---|---|---|
 Revitilisation potion (Super Restore) Revitilisation potion (Super Restore) |  Buchu Buchu |  Stinkhorn Mushroom Stinkhorn Mushroom |
 Xeric’s Aid (Saradomin Brew) Xeric’s Aid (Saradomin Brew) | Buchu |  Endarkened Juice Endarkened Juice |
 Prayer Enhance Prayer Enhance | Buchu |  Cicely Cicely |
 Elder Potion (Super Combat) Elder Potion (Super Combat) |  Golpar Golpar | Stinkhorn |
 Kodai Potion (Magic) Kodai Potion (Magic) | Golpar | Endarkened Juice |
 Twisted Potion (Ranged) Twisted Potion (Ranged) | Golpar | Cicely |
 Overload Overload | | Elder Potion, Kodai Potion, Twisted Potion + Noxifer |
Secondaries (Stinkhorn, Endarkened Juice & Cicely) can be gained by fighting Scavengers which should spawn somewhere in your raid.
If you get unlucky and need seeds, you ran rake the farm patch in the resource room for seeds.
During the prep, you (or the herblorist on your team) will make 1 overload & 1 prayer enhance for each player, and enough Xeric’s Aid & Revitilisation Potions to fill the rest of your inventory + 1 extra Xeric’s Aid/Revitilisation for reporting.
Prepotting
Before we go into Olm’s room, we’re going to prepot. This means we’ll take a sip of our Overload, and drink 3 doses of Xeric’s Aid & 1 Dose of Revitalisation.
The strategy for this is to drop 1 Xeric’s Aid and 1 Revitalization on the floor before filling your inventory back up. Then sip your overload, brew up, sip your restore, and drop your used Brew/restore for a fresh one from the floor.
Once that’s done, equip your BGS/DWH and enter Olm’s room.
The Great Olm (Final Boss)

The Great Olm is the final boss you fight in Chambers of Xeric. This boss has four different phases, 2 different standard attacks, and a bunch of special attacks that you will have to learn.
This might seem daunting at first but it’s really not that bad if you take your time to study the phases and learn the special attacks before starting your first learner raid.
If you go into your first raid prepared, I guarantee you will get Olm down after just a couple of attempts. Everyone dies during their first couple of Olm fights so don’t be discouraged when you die. It happens.
Make note of your mistakes and make sure you always know why you died when you do. Knowing why you died is key to mastering Olm. If you don’t know why you died, then
Not knowing why you died means there are mechanics that don’t make sense to you so you should master them. I’d suggest you come back to this article to study the special attacks and phases and try again. Don’t just hop in for another raid and keep making the same mistakes. Learn from them.
If you really can’t figure out why you keep dying, ask your team for tips or record yourself and pay attention to your mistakes.
![]() Here’s a Strategy Guide for Olm
Here’s a Strategy Guide for Olm ![]()
Overview of all phases
At the start of the fight (phase 1) Olm will spawn on a random side of the room. Olm consists of 3 parts: his right claw, his head, and his left claw. During the first three phases, you only focus on Olm’s Claws and only during the final phase (also known as the head phase) do you attack the head.
His right hand (which is your left btw) is weak to Magic and his left hand (your right) is weak to Melee.
Phases 1-2 are basically identical where one person will focus on the mage hand, one person will focus on the melee hand and the remaining players (known as runners) will attack both hands as they run in front of Olm’s head.
In between each phase, AoE crystals will fall down from the ceiling. These can be avoided by moving around whenever a shadow is cast underneath your character. Though keep in mind that they are AoE and cover a 3×3 area.
Phase 3 is similar to phases 1-2 with the only difference being that both hands need to go down at the same time (you have about 10 seconds) otherwise they will heal each other. You know you are in this phase when his head starts glowing.
During the final phase, also known as the head phase, AoE crystals will continuously fall down from the ceiling. At this point you use ranged to finish of Olm. Once defeated, you are done and can claim your first raid reward! Glgl.
Olm Mechanics
One of the first mechanics you should know about Olm is that he is constantly turning his head to scan for players to attack. If you aren’t in his FOV, you will not be attacked.
This is the reason we use runners when fighting Olm. Runners force Olm to continuously move his head. When done correctly, runners won’t take damage from Olm and the two players camping the melee/mage hand will only get attacked whenever Olm is looking in their direction.
Olm’s Attack Sequence
Olm has a fixed attack sequence. It goes as follows:
- Basic Attack
- Empty Event
- Basic Attack
- Crystals
- Basic Attack
- Lighting
- Basic Attack
- Empty Event
- Basic Attack
- Portals
- Repeat
Basic Attacks are made up of his basic Ranged & Magic Attacks but can also be replaced with phase-specific attacks.
During the head phase, Olm doesn’t use any of his special attacks but AoE crystals will fall from the ceiling and he still uses all of his Basic Attacks (all phase-specific attacks + the basic Ranged/Magic Attack).
Note: Olm attacks on a 4-tick cycle, just like a whip or Dragon Hunter Lance.
Olm’s Attacks
Auto Attacks
Olm has two Auto Attacks: Magic & Ranged. These are easily identifiable. If you see a green flame, pray Magic, if you see a Green dot, pray Ranged.

Prayer Orbs
Every now and then, Olm may shoot spheres (also known as Prayer Orbs) in your direction. When this happens, your prayer will be switched off. You have to respond by turning on the correct prayer to prevent taking a ton of damage.
- Purple Prayer Orb: Protect from Magic
- Red Prayer Orb: Protect from Melee
- Green Prayer Orb: Protect from Missiles

Falling Crystals
In between each phase, crystals will fall from the sky. These crystals are AoE and can deal damage in a 3×3 range. You can see where crystals are falling by the shadow they cast on the floor. The key is too keep moving until Olm spawns.
Falling Crystals also occur during the final phase of the Olm Battle, also known as the head phase.
Phase-Specific Attacks
Phase-specific attacks replace a basic attack on his attack cycle. These are not to be confused with special attacks.
| Acid Spray | Olm covers the room in Acid. | Avoid or you will take damage per tick and get poisoned |
| Acid Trail | Olm covers one player in poison | Turn off run and walk around the room until the trail runs off (stay away from your teammates!) |
| Fire Wall | Olm traps one player in a wall of fire | Douse the fire (or ask a teammate who brought water/ice spells) |
| Burn with me | Olm shoots a green fireball at you causing you to take damage and stat decreases | AVOID TEAMMATES as it will spread to them as well |
| Falling Crystals | Olm targets one player with falling crystals indicated by a red aura | Move away to avoid damage |
| Crystal Bombs | Olm shoots Crystal Bombs around the room | Make sure you are 4 tiles removed to avoid damage |
Special Attacks
| Crystals | A crystal grows underneath you | Move one tile away |
| Portals | A while portal glows around you | Meet at Melee Thumb |
| Lighting | Olm throws lighting paths across the room that turn your prayer off | Avoid them. If you get hit, turn your prayer back on. |
| Healing | Melee hand has infinity symbol | Seize attacking the melee hand to avoid healing |
CoX Rewards
At the end of the raid, players can loot the Ancient Chest. A white light shines from the chest by default which changes to purple if you hit a unique drop.
Don’t leave the raid before looting the chest otherwise, you will lose its contents!
According to the Wiki, you get a 1% chance of obtaining a Unique Reward for every 8,675 points you get during Chambers of Xeric.
So if your team averages 60,000 points per raid, you have a combined chance of 7% to obtain a unique drop.
Or if you average 20,000 points per raid, you have a 2.3% chance of obtaining a unique drop.
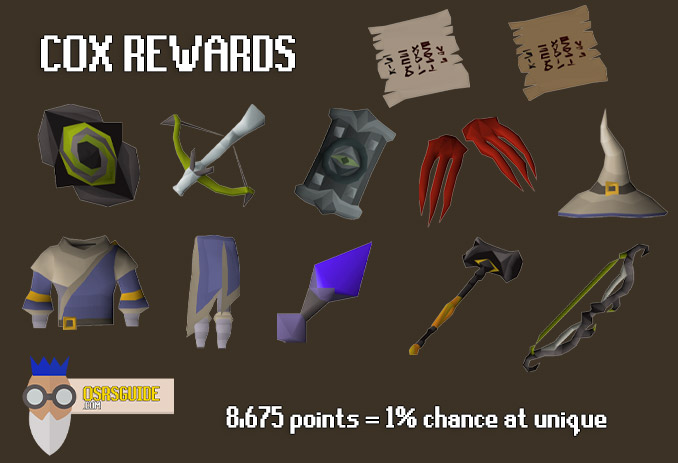
Here are some of the unique rewards from CoX & their droprate.
| Unique Drops | Droprate | Price |
|---|---|---|
| Arcane Prayer Scroll | 1/3.45 | 3M |
| Dexterous Prayer Scroll | 1/3.45 | 32M |
| Twisted Buckler | 1/17.25 | 14M |
| Dragon Hunter Crossbow | 1/17.25 | 69M |
| Dinh’s Bulwark | 1/23 | 13M |
| Dragon Claws | 1/23 | 91M |
| Ancestral Hat | 1/23 | 40M |
| Ancestral Robe Top | 1/23 | 169M |
| Ancestral Robe Bottoms | 1/23 | 138M |
| Elder Maul | 1/34.5 | 10M |
| Kodai Insignia (to make Kodai Wand) | 1/34.5 | 74M |
| Twisted Bow | 1/34.5 | 1.4B |
CoX Quality of Life Update
Here is a summary of the CoX changes, added to the game on November 29, 2023.
General Changes
- Scouting improvement:
- Right-click on the stairs in the lobby to generate a fresh layout without having to run to the Recruitment Board.
- Raid Difficulty:
- Raid Leaders can scale up Raid difficulty by adding invisible players.
- Energy Pools:
- Energy Pools are more common in the raid, reducing the need for Stamina Potions.
- Item Drops:
- Common food and potions dropped within the Raid are now visible to all account types.
- Growth times for certain plants (Buchu, Golpar, Noxifer) are reduced.
Room Changes
Scavenger Beasts
- Scavengers now guaranteed to drop endarkened juice, Cicily, and mushrooms
- Mallignum Root Plank are stackable
- Mining and Woodcutting shortcuts are sped up
Tekton
- First Dragon Warhammer special against Tekton is now guaranteed to hit.
- Tekton can no longer regain defense using his anvil.
Jewelled Crabs
- Players can no longer splash on crabs with a Magic bonus higher than -64.
- Attack Delay removed when hitting jewelled crabs.
- Standardized potion rewards for defeating crabs.
Ice Demon
- Kindling is now stackable.
- Increased points for lighting braziers and burning kindling.
- Potion secondaries guaranteed for all players after defeating the Ice Demon.
- Magic Defence reduced from 60 to 40
Vanguards
- Standardized potion rewards for defeating Vanguards.
Thieving
- Improved success rates for opening chests in the Thieving room.
- Guaranteed Grub drop when opening a chest.
- Grubs are stackable.
Vespula
- Changes to make Vespula more accessible without Redemption method.
- Lux grubs’ HP increased, Medivaemia Blossoms now heal more.
- Reduced damage from Vespula and her Vespine soldiers.
- Guaranteed overload
Vasa Nistirio
- Reduced Vasa’s Ranged defense from 60 to 40
- Changes to Vasa’s healing mechanic.
- Guaranteed Overload
Skeletal Mystics
- Portals added for easier navigation in the Mystic room.
Muttadiles
- Max damage reduced
- Big muttadile only swaps between ranged/magic after using the same style 3 times in a row
- Changes to hopping Strategy:
- RNG Removed from the tree in favor of a standard damage formula based on: (Woodcutting level / 2) – 2, plus or minus 5.
- Changes to Freezing Strategy:
- Muttadiles move to tree at 50% instead of 40%
- Players can damage muttadile even when they are frozen
Olm Changes
- Olm’s portal swap special spawns a portal within 10 tiles in solo encounters.
- Olm’s Healing pool attack has a cooldown of 10 attacks.
How to Find Raiding Partners
The easiest way to find a team for raids, is to join the WeDoRaids discord channel.
These guys have done a fantastic job at making a Raiding Community within OSRS. Not only can you find teams here, you can also join learner Raids, ask questions, and get tons of valuable advice.
Here’s an invite to the WeDoRaids Discord.
How to learn coX
If you are a learner without friends to raid with, join WeDoRaids Discord. They constantly host learner raids.
If you have a group of friends that you want to start raiding with, here’s a checklist for you:
- Scout 3 Combat 2 Puzzle rooms (read section)
- Avoid: Tekton, Vespula, Vanguards, Vasa
- Double-check your inventory before starting the raid!!
- Lockpick: Thieving room
- Pickaxe: Guardians
- Muttadiles: Barrage Runes
- Mystics: Salve (ei)
- One person must have water spells/ice spells to dose fire at Olm
- Import tiles for Olm (Tiles included in Olm Strategy Guide)
- Assign roles for Olm Phase (checkout our Olm Strategy Guide)
- Optional: Suicide in front of Olm with full inventory of brews/restores to make the fight easier, these will stay on the floor and allow you to make more mistakes
Accept that you will die a lot. Don’t worry about points at the beginning, don’t worry about being efficient or rushing the raid, just focus on mastering each room & beating Olm.