
This is a complete guide to the Blast Furnace, a minigame that offers the fastest smithing experience in OSRS.
This article is part of my 1-99 Smithing Guide covering every smithing method available.
The Blast Furnace is a minigame that becomes available at level 1 smithing, with players unlocking gold bars (best method) at level 40 smithing.
This minigame is located in Keldagrim, and the Giant Dwarf Quest must be started to gain access. This is as simple as speaking with the Dwarven Boatman located East of Rellekka (location at 0:59 in the video guide above).
After speaking with him, you can now teleport to the Blast Furnace via your Grouping Teleport menu.
There are two ways to train smithing at the Blast Furnace:
- Gold Bars
- Bronze – Runite Bars
Many players choose to do Gold Bars because this can offer up to 400k EXP/hr at max efficiency and is the fastest smithing method in the game currently. It’s also most convenient as you only need to bring gold ore to the furnace, and you don’t have to worry about coal. The downside is that you lose money with this method.
As an alternative, choosing metal bars (Bronze – Runite) is also a viable option that offers decent experience rates AND can make you money while training your smithing.
Both methods are covered in this guide.
How it works
The Blast Furnace is a minigame in which players rent a furnace on an hourly basis, at a cost of 72,000 GP per hour. The core advantage here is that this furnace smelts bars instantly, providing some of the best smithing experience rates in the game. Furthermore, the Blast Furnace operates more efficiently than other furnaces, requiring just 50% of the usual coal requirements.
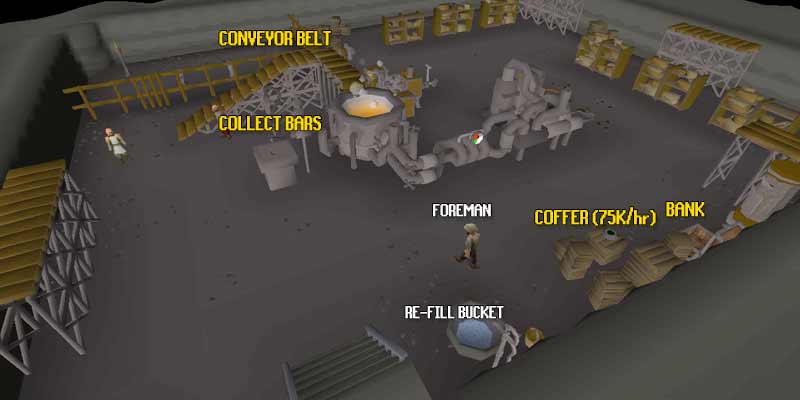
With the bank being just 1 click away, this is a medium-effort smithing training method that is very grindable and easily one of the best ways to get 99 Smithing AND make money with the smithing skill.
One final note: you will have to play this minigame in one of the official official worlds:
- 352/395/466 (GER)
- 355/356/357 (US West)
- 386/494/495 (US EAST)
- 387/424 (AUS)
- 358/515/516 (UK)
There are some requirements & must-have items to make this minigame viable.
Requirements
- Hourly payment: 72K GP per hour (deposit in coffer) + 2500 GP bribe for the foreman every 10 minutes if you have less than 60 smithing
- Started the Giant Dwarf Quest
Recommended Items
Here’s everything you need to make the Blast Furnace as efficient as possible:
| Items | Requirement | Why it’s helpful |
|---|---|---|
| Goldsmith Gauntlets | Family Crest Quest (info here) | Get 2.5x more experience smithing gold bars |
| Ice Gloves | Killing Ice Queen (info here) | Removes the need for a bucket of water |
| Graceful Outfit | Reward from Agility Rooftop Courses | Restore run energy 30% faster |
| Stamina Potions | 10,340GP each | Reduces run energy depletion by 70% |
| Coal Bag | Reward from Motherlode Mine | Carries 28 extra coal (not needed for gold bars!) |
It’s 100% recommended that you obtain the above-mentioned items if you plan to use the Blast Furnace method all the way to 99.
Smithing gold bars is not worth it without Goldsmith Gauntlets, you are better off using an alternatively listed method if you don’t have access to them.
Ice gloves are easy to obtain so make sure you get that out of the way as well.
Graceful takes a while to obtain, so it’s possible to skip this step.
Stamina potions are expensive at 2.5K per sip or 80k GP per hour but do make a huge difference in experience rates.
If you plan on using the Blast Furnace for any other bar type, acquiring a coal bag from Motherlode Mine which carries 28 pieces of coal is recommended.
Getting there
If you haven’t started the Giant Dwarf quest, yet, you will have to do this to unlock the city of Keldagrim where the Blast Furnace is located. You don’t need to do anything other than speak with the Dwarven Boatman, located in a cave East of Rellekka.
So make your way to Rellekka (fairy ring D-K-S, or run here from Seers’ Village) first and enter the cave as shown below.
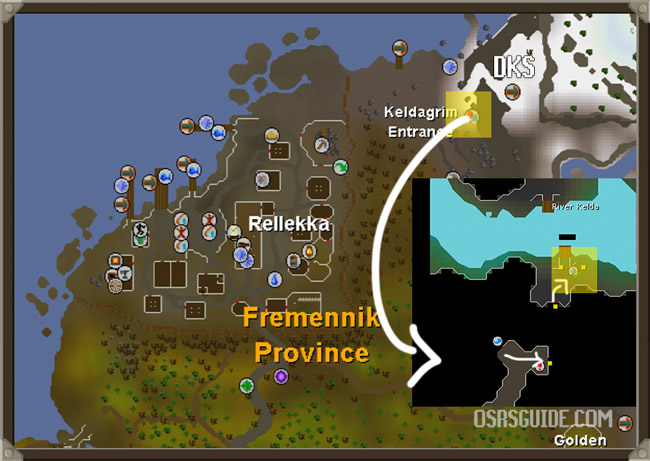
You can also see me running to the boatman at 0:59 in the video guide at the start of this article.
Once/if you have started the Giant Dwarf Quest, you can easily get to the Blast Furnace by teleporting via your Grouping Teleport Menu. Alternatively, take the trapdoor at the Grand Exchange.
Gold Bars at the blast furnace
Gold bars are unlocked at level 40 Smithing at the Blast Furnace. Players with less than 60 Smithing will have to pay the foreman 2500 GP every 10 minutes.
Note: To unlock max experience, you will need Goldsmith Gauntlets, a reward from the Family Crest Quest. These offer 2.5X experience when smithing gold ore.
You will also need Ice Gloves to avoid having to add an extra step in the process.
Here’s what a classic run of gold ores at the Blast Furnace looks like:
- Get a full inventory of Gold ore from the bank
- Deposit them at the Conveyor belt with ice gloves equipped
- Collect the bars from the dispensor
- SWITCH to your Goldsmith Gauntlets once you get the message “you take 27 gold bars from the dispensor” to get get your full experience reward
Note: there is a small delay caused by the Blast Furnace smelting your bars, this delay can easily be avoided by ensuring you always have bars inside the dispensor. Set this up by depositing a full inventory of gold ores and leaving them in the dispensor. This ESSENTIAL STEP is also covered in my video guide above.
Once you get the hang of this process, be sure to check out my video guide to see how you can easily achieve 400K EXP/hr by doing efficient runs.
TIP: If your goal is to achieve 70 Smithing for Song of the Elves, gold bars is the way to go!
Note: running gold bars is expensive at 572K GP/hr (stamina + gold ore + hourly fee).
Making money with the blast furnace
Not everyone has millions to drop on their smithing training. Those people can choose to make bars instead. This process is slightly more complex, as you’ll need to bring the right amount of coal as well, but it’s not so bad once you get the hang of it.
Below is a table showing the latest rates (January 2024), click on the links to verify for yourself.
| Bar | GP/hr |
|---|---|
| Steel Bars | 540k |
| Mithril Bars | 560k |
| Adamantite bar | 660k |
| Rune bar | 715k |
Here’s how much coal you’ll need for each ore type:
- Iron bars: 0 coal
- Steel bars: 1 coal per ore
- Mithril bars: 2 coal per ore
- Adamant bars: 3 coal per ore
- Runite bars: 4 coal per ore
Here’s a quick example of a run using Steel bars:
- Get a full inventory of Coal Ore from the bank, add to the Conveyor Belt
- Bank again and grab a full inventory of Iron Ore, add to the Conveyor Belt
- Now Collect your bars from the Dispenser and bank
- Rinse and repeat!
Now of course this process is much faster with a coal bag.
| Bar | First run | Second run | Third run | Fourth run |
|---|---|---|---|---|
| Gold bar | 27 gold ore | repeat 1… | ||
| Iron bar | 27 iron ore | repeat 1… | ||
| Steel bar | 27 iron (27 coal in coal bag) + collect | repeat.. | ||
| Mithril bar | 27 coal (27 coal in coal bag) | 27 mithril ore (27 coal in coal bag) Collect | 27 mithril ore (27 coal in coal bag) collect | repeat 1&2.. |
| Adamantite bar | 27 coal (27 coal in coal bag) | 27 adamantite ore (27 coal in coal bag) | repeat 1&2.. | |
| Rune bar | 27 rune (27 coal in coal bag) | 27 coal (27 coal in coal bag) | 27 coal (27 coal in coal bag) + collect | repeat 1&2 + collect then repeat 1,2,3 |
*Players without Ice Gloves will have to leave an inventory slot for a bucket which they can fill with water and use on the dispenser to cool it down before collecting the bars.
Extra steps for low-level accounts:
- If you don’t have ice gloves, you’ll need to douse the dispenser with a bucket of water as an extra step before collecting bars
- If you don’t have 60 smithing, you’ll have to pay the foreman every 2500gp every 10 minutes. This money doesn’t come out of the coffer, you’ll need to take it from the bank and pay him directly by speaking with him.
Wrap Up
That’s about everything you need to know to get started with the Blast Furnace. This is my personal favorite method to train smithing because it’s relatively low effort and can easily be done while watching some youtube or netflix on the side.
I recommend doing this activity in 1-2 hour intervals.
I also recommend you check out my video guide at the start if you struggle to achieve 400K exp/hr doing gold bars. It features my personal strategy for efficient pathing and zero delays!
For additional smithing methods, check out my 1-99 Smithing Guide.