

In this OSRS Sleeping Giants Quest Guide, we’ll go through all the steps to complete the quest.
This guide is a part of our OSRS Optimal Quest Guide.
Sleeping Giants story & info
Sleeping Giants is the introductory quest for the Giants’ Foundry minigame. You need to complete this quest to get access to the minigame. The quest is pretty short and serves as a good tutorial for the mini-game. Once you are done with the quest, you will understand how Giants Foundry works.
Quest Requirements
 Skill Requirements
- 15 Smithing
TIP: complete The Knights Sword quest first. This short quest will take you from levels 1 – 29 Smithing!
 Quest Requirements
There are no quest requirements.
 Item Requirements
| Item | Grand Exchange? | Obtainable during Quest? |
|---|---|---|
| Chisel | Yes | No |
| 3 Oak Logs | Yes | No |
| 1 Wool (NOT BALL OF WOOL) | Yes | No |
| 10 Nails | Yes | No |
| Hammer | Yes | No |
 Recommendations
Ice gloves are handy

Sleeping Giants Guide
Quest Start
| How to get here: | – Grouping Teleport to ‘Giants Foundry’ – Glory Teleport to Al Kharid – Lumbridge Teleport and run East (don’t forget 10GP if you haven’t completed Prince Ali Rescue) |
Use the Minigame Teleport in your Grouping Menu to teleport to Giants Foundry.
OR run to the Giants Fondry southeast from Al Kharid and South from the PVP Arena.
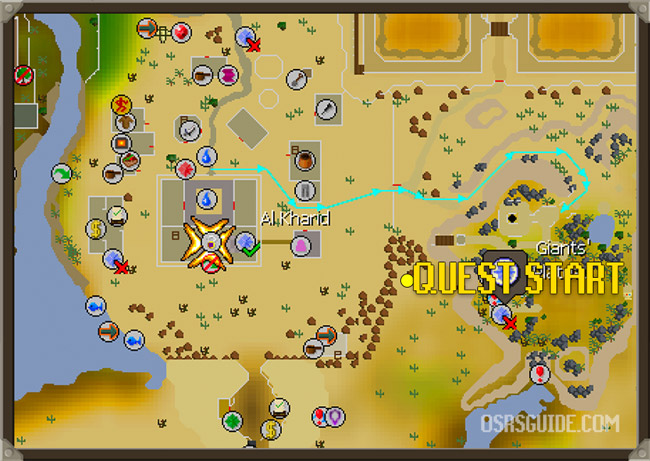
Here, look for the Hill Giant that has the ‘strike option’ located next to the cave.
Try to strike this hill giant, his name is Kovac and he needs your help.
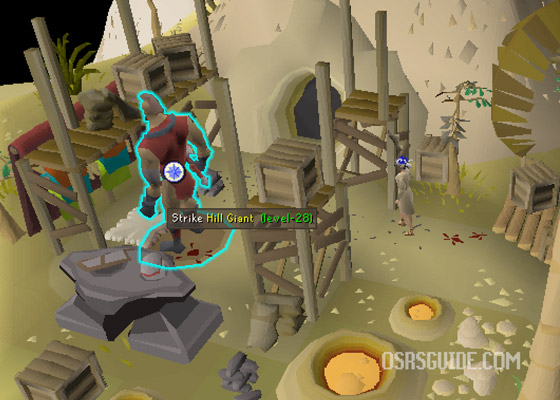
A cutscene will start in which you enter the cave.
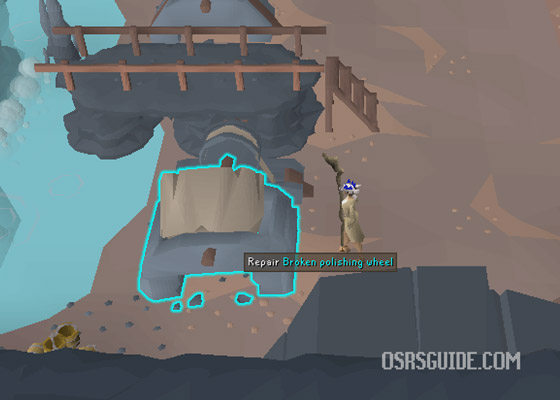
Helping Kovac with repairs
| Items needed: | – Wool – 10 Nails – Hammer – Chisel – 3 Oak Logs (unnoted) |
Kovac needs you to fix some things, luckily we already have the materials on us.
Repair the Broken Polishing Wheel.
Next, Repair Broken Grindstone.
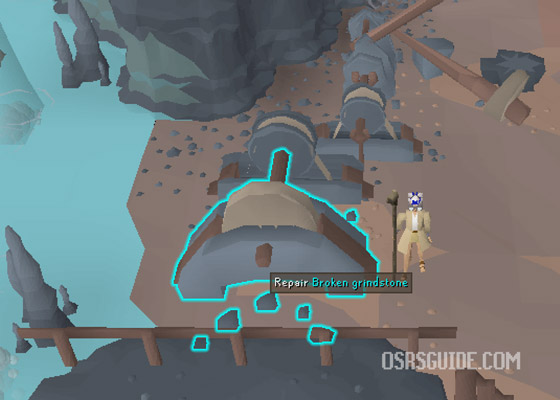
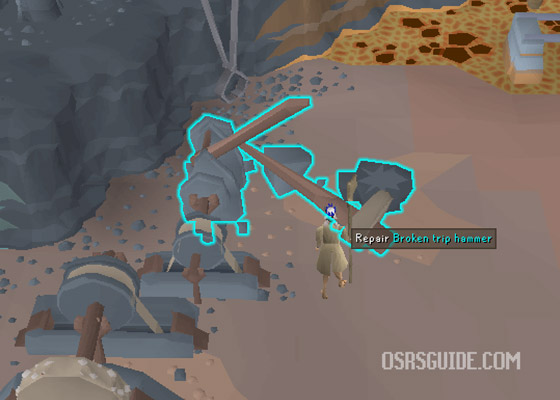
And finally, Repair Broken Trip Hammer.
Now speak with Kovac.
Creating the Sword: Setup Phase
Speak with Kovac again.
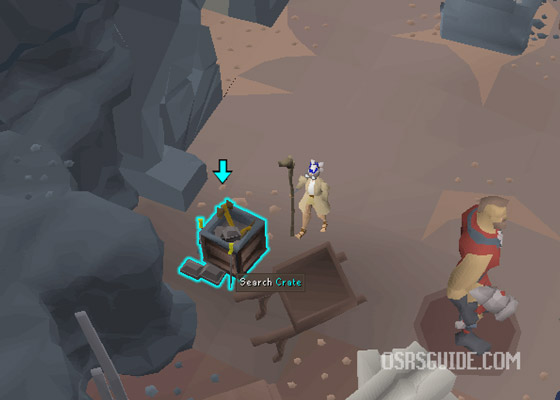
Now search the crate next to Kovac.
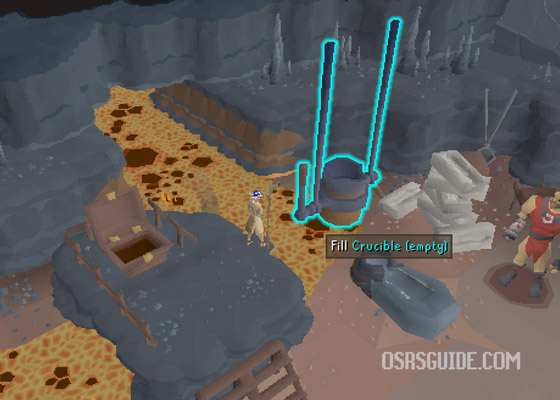
Now fill crucible with the bronze and iron bars you just received.
Then, use the iron longsword, Bronze battleaxe, and platebodies on the crucible as well.
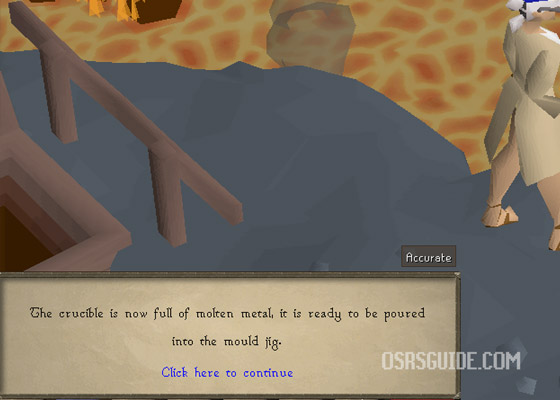
Once you’ve added all the bars and items, you will get a message that the crucible is full.
Next, speak with Kovac again.
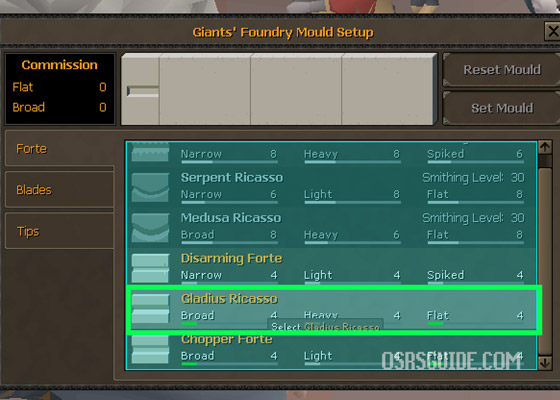
He will tell you to fill each part of the mould:
- Forte
- Blade
- Tip
he will remind you – Flat and Broad – which mould you need. (this is the same for everyone)
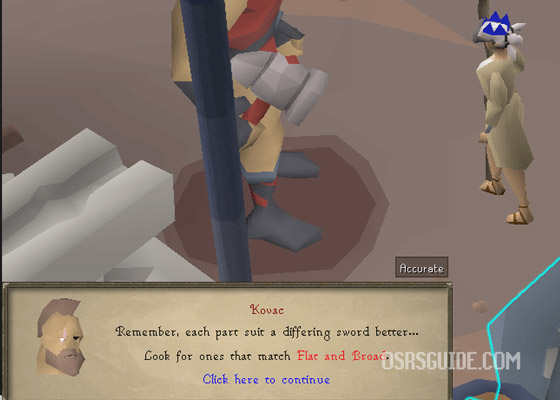
So we are making a Flat Broad Sword.
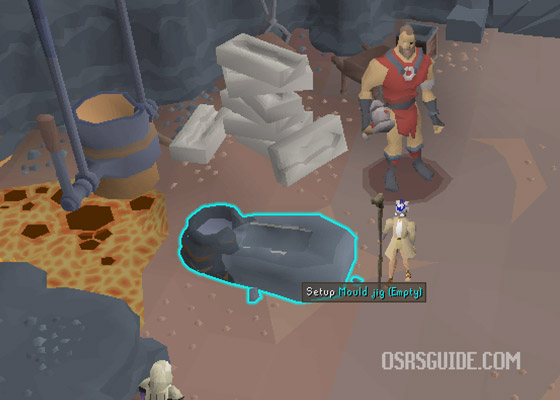
Click on the Mould Jig next to Kovac.
Under ‘Forte’ select that which matches Broad and Flat. (Gladius Ricasso)
Now for Blades, select Medusa Blade.
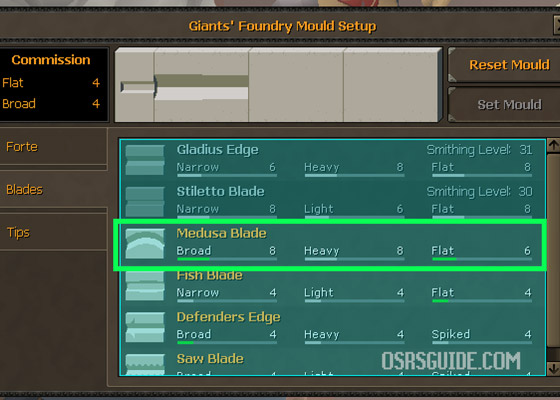
And finally, for tips select Medusa’s Head.
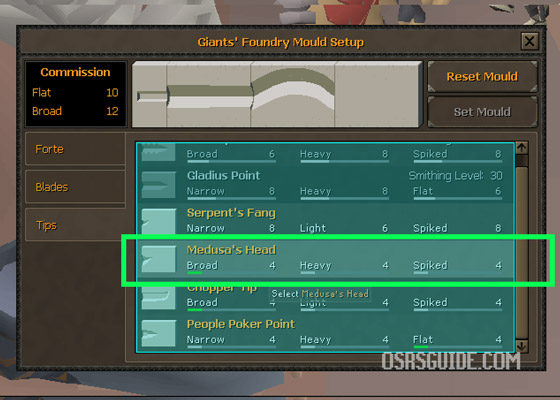
Once finished, click on ‘Set Mould’ in the top right.
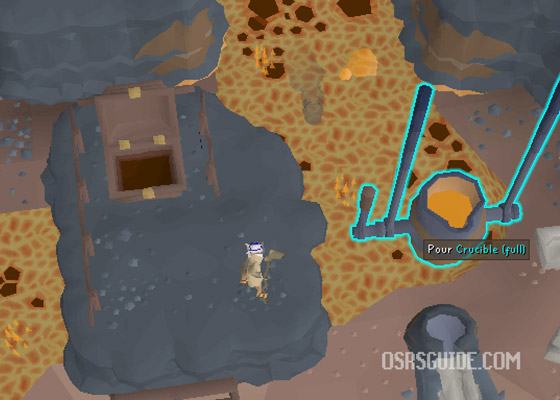
Then, speak with Kovac again.
Return to the crucible and select ‘pour’.
Now grab a bucket of water (or skip, if you have ice gloves) from the pile of buckets.
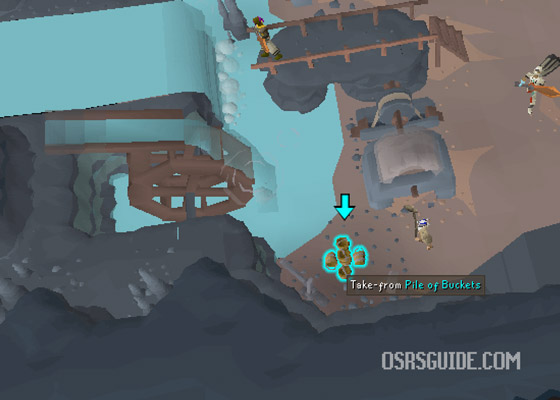
Go on the bridge and fill your bucket on the waterfall.
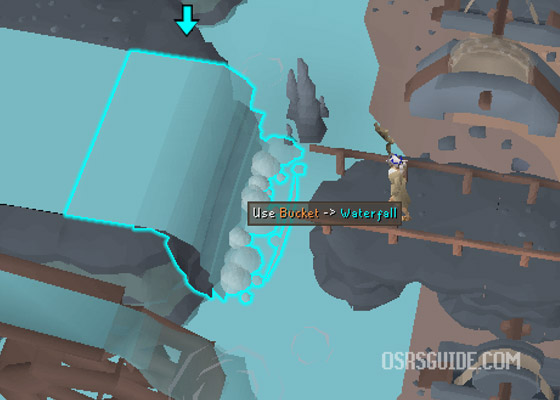
Now use your bucket of water on the Mould Jig.

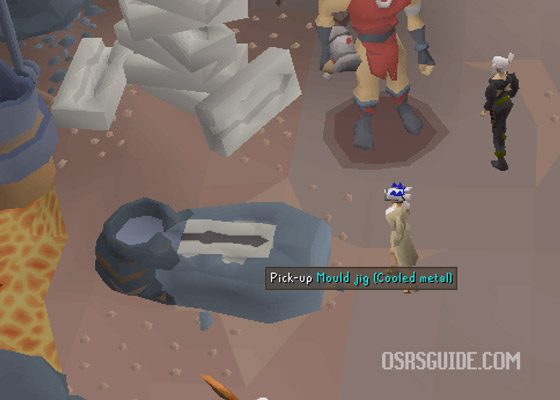
And finally select ‘pick up Mould Jig’.
(Your hands must be free for this step, so unequip your weapons if you have them).
Creating the Sword: Refinement Phase
Now you will see a User Interface pop up on your screen.

Giants’ Foundry HUD Explained
The Giants Foundry Hud has three different bars: Quality, Temperature & Completion.
Quality:
- Shows how the quality of your sword
Temperature:
- Depending on the action you are performing, you will want this to be HOT, Medium, or COOL.
% Complete:
- This bar decides which action you have to do:
- Action 1 (Red Bar) = use Trip Hammer
- Action 2 (Yellow Bar) = use Grindstone
- Action 3 (Green Bar) = use Polishing
How Giant’s Foundry works
Once you have your preform, you have 3 steps to complete:
- Trip Hammer
- Grindstone
- Polishing
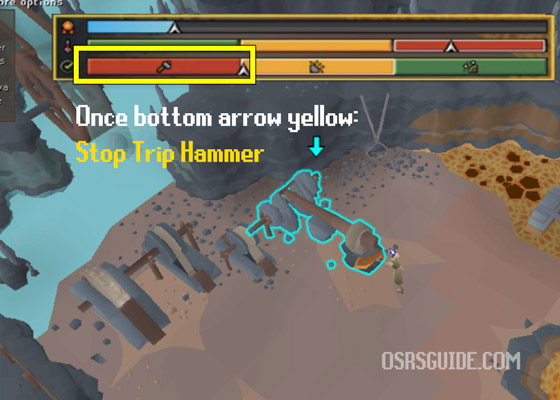
Trip Hammer
Requires HOT sword. This tool takes the imperfections out of the sword.
- Use the Trip hammer only while your white arrow indicator is in the red bar.
- Dunk your Preform in the Lava Pool whenever it nears yellow.
- Never let the indicator leave the Red bar.
Grindstone
Requires sword at Medium heat. This tool makes the sword smooth.
- Use the Grindstone only while white arrow indicator is in the Yellow bar.
- Quench-preform at waterfall whenever indicator is near the red bar.
- Never let the indicator leave the Yellow bar.
Polishing Wheel
Requires Cool Sword. This tool cleans the sword and polishes it.
- Use the Polishing Wheel only while white arrow indicator is inside the Green bar.
- Dunk your preform in the Lava Pool whenever the sword gets too cold (white arrow reaches to close to the edge)
- Never let the indicator get too close to the edge
Trip Hammer Phase (White arrow in Red Bar)
First, use the Trip Hammer. The white arrow needs to stay in the red section.
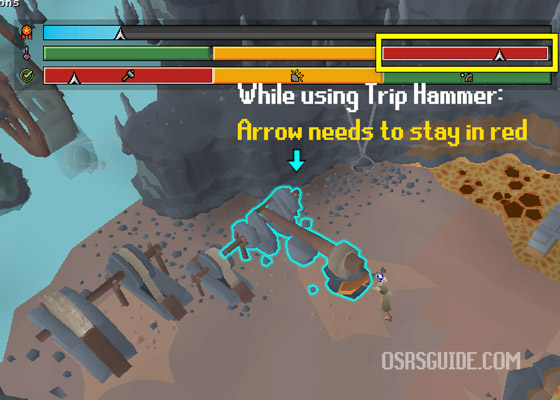
STOP using the Trip Hammer BEFORE the white arrow reaches the Yellow Section.
Then, go to the lava behind the Trip Hammer, right-click and select ‘Dunk Preform’.
Dunk the preform until the red arrow is ALMOST at the end.
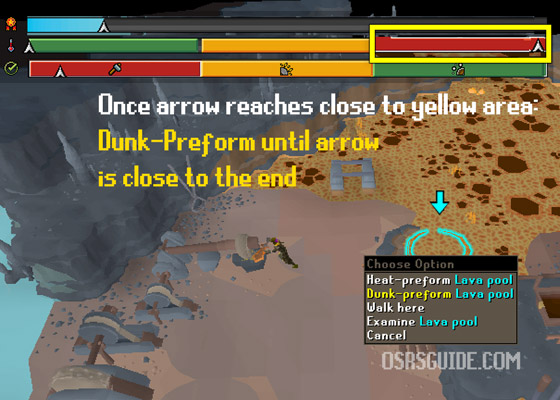
Continue with the Trip Hammer.
Each time the arrow gets close to yellow bar (AKA the sword loses heat), Dunk-Preform in the Lava Pool and repeat.
Once the white arrow at the bottom reaches the yellow bar, it’s time to move on to the Grindstone.
Grindstone Phase (White arrow in Yellow Bar)
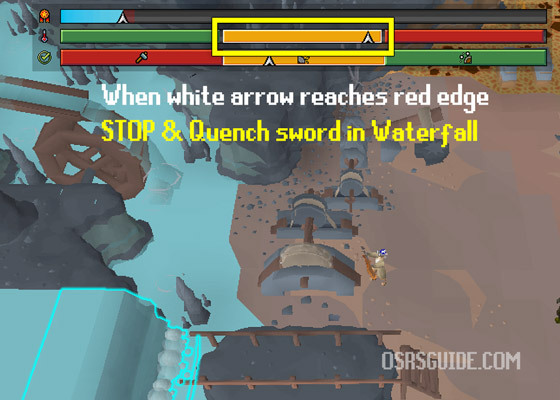
Use the Grindstone. Pay attention to your temperature bar, if the arrow reaches the edge with the red bar, it’s time to cool it down.
Quench the sword in the waterfall to cool it down. Repeat until you reach the final phase (green).
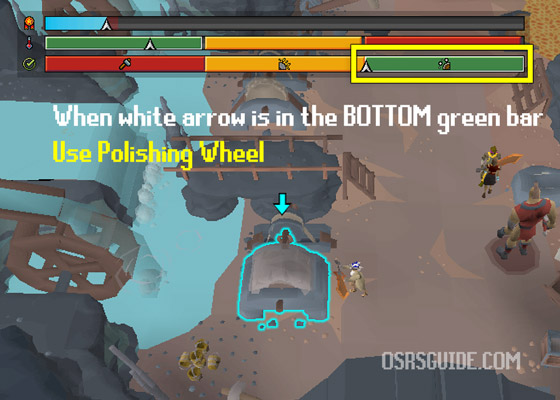
Once your bottom white arrow reaches the Green Bar, it’s time to use the Polishing Wheel.
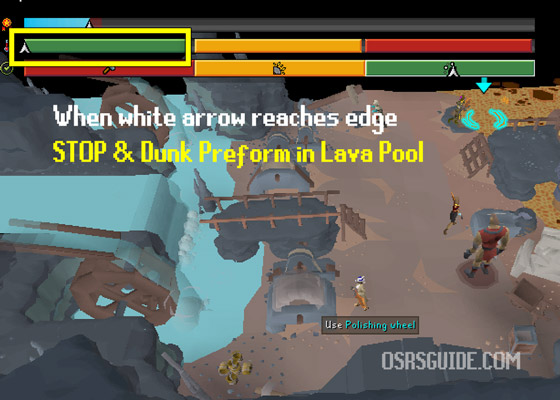
Polishing Wheel Phase (White arrow in Green Bar)
Use the polishing wheel.
Every time your preform gets too cold, dunk it in the Lava Pool. Repeat until your sword is finished.
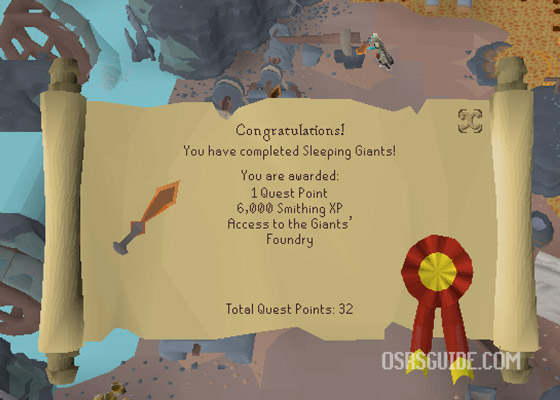
Once finished, Speak with Kovac again.
And your quest is complete!
Quest Rewards
- 1 Quest Point
- 6,000 Smithing experience
- Access to the Giant’ Foundry minigame
Sleeping Giants Quick Guide
If you prefer videos, you can check out Slayermusiq’s video guide on Sleeping Giants.